Finger Capture
Introduction
Overview
Human finger ridges are acknowledged as detailed, difficult to alter, nearly unique, and durable over the life of an individual. The probability of two people having the same fingerprints is near 1 in 64,000,000,000. This makes finger ridges good long-term markers for human identity.
Capture SDK offers an opportunity to apply this feature for easy authentication, or even identification, in everyday life, using any modern Android or iOS smartphone equipped with a standard camera. Capture SDK is a software library which can be used for scanning fingerprints.
Capture SDK features:
- fingerprints acquisition resulting in raw images of finger ridges, which can be even converted into worldwide WSQ1 format with a built-in converter
- extracting biometrics data
- storing biometrics data
- comparing biometrics data in order to authenticate (1:1) or identify (1:N)
Once the biometrics data is extracted, fast authentication mode can be utilized, shortening the process so that it encompasses fingerprints acquisition and authentication only.
Architecture

The library consists of five main components:
- FingerCaptureHandler - responsible for performing the capture. It handles a camera, so there's no need to handle the system camera's API. The component receives the camera stream, analyzes chosen frames, and pushes the camera stream to the preview component. During callbacks, it's possible to retrieve information about the status of the capture and its result.
- LicenseManager - responsible for license management. An activated license is needed in order to use the SDK.
- MatcherHandler - a component which can be used for extracting biometrics data from raw images. Moreover, it is possible to compare biometrics data against other sets of data already available.
- BIOStore - a group of static methods which can be used for storing biometrics data.
- ImageUtils - a bundle of methods which can be used for image processing. The SDK provides a result of a capture in the form of raw images (SDK's internal format). It's essential to use
ImageUtilsto convert the raw format into another, one that is commonly used: WSQ1, JPEG2 or JPEG20003.
Variants
Capture SDK comes in six different variants. Finger modality is present in three of them: Full SDK, Biometry and Finger.
-
Full SDK - It contains all the features of the SDK. Includes components: LicenseManager, FaceCaptureHandler, FingerCaptureHandler, BioMatcherHandler, BioStoreDB, DocumentCaptureHandler, ImageUtils. You can integrate it into your project by specifying it in your Podfile:
pod 'BiometricSDK'. -
Biometry variant - It contains all biometric features including face and finger capture and also biometric coding and matching used for liveness checking. Includes components: LicenseManager, FaceCaptureHandler, FingerCaptureHandler, BioMatcherHandler, BioStoreDB, ImageUtils. You can integrate it into your project by specifying it in your Podfile:
pod 'BiometricSDK-biometry'. -
Document variant - It contains only document capture features. Includes components: LicenseManager, DocumentCaptureHandler, ImageUtils. You can integrate it into your project by specifying it in your Podfile:
pod 'BiometricSDK-document'. -
Finger variant - It contains only finger capture features including biometric coding and matching used for finger liveness checking. Includes components: LicenseManager, FingerCaptureHandler, BioMatcherHandler, BioStoreDB, ImageUtils. You can integrate it into your project by specifying it in your Podfile:
pod 'BiometricSDK-finger'. -
Face variant - It contains only face capture features without biometric coding and matching, so for liveness checking you need to use external server. Offline liveness checking is not available. Includes components: LicenseManager, FaceCaptureHandler, BioStoreDB, ImageUtils. You can integrate it into your project by specifying it in your Podfile:
pod 'BiometricSDK-face'. -
Face+document variant - It contains only face capture features without biometric coding and matching, so for liveness checking you need to use external server. Offline liveness checking is not available. Additionally it contains also document capture features. Includes components: LicenseManager, FaceCaptureHandler, BioStoreDB, DocumentCaptureHandler, ImageUtils. You can integrate it into your project by specifying it in your Podfile:
pod 'BiometricSDK-face_document'.
Integration guide
Prerequisites
The integration shall be done by developers with knowledge of:
- Xcode
- Swift or Objective-C
- SDK is not supporting Swift 6 language mode.
- iOS platform
- (optional) CocoaPods
The required tools are:
- Xcode (with support for iOS 15.0 deployment target or higher)
- iOS device (simulator is not supported)
Installation
We serve our artifacts with from Artifactory. As an integrator you can choose one the methods of adding our framework to your project:
- using CocoaPods
- manually
CocoaPods
Our CocoaPods distribution method uses cocoapods-art plugin, so you need to install it by adding to your Gemfile or running the following command:
Shell1gem install cocoapods-art
- The plugin uses credentials stored in .netrc file.
Netrc1machine artifacts.ips.idemia.com2login ##USERNAME##3password ##PASSWORD##
- Once credentials are present in .netrc, add our repo to your CocoaPod's dependency management system:
Shell1pod repo-art add smartsdk "https://artifacts.ips.idemia.com/artifactory/api/pods/smartsdk-ios-local"
- At the top of your project
Podfileadd:
Ruby1plugin "cocoapods-art", sources: [2 "smartsdk" # so it could resolve BiometricSDK dependency3 "master", # so it could resolve dependencies from master repo (the main one), for newer CocoaPods (1.10+) versions it may not be needed anymore4]
- Add a variant of Capture SDK in your
Podfile:
Ruby1pod "BiometricSDK" # Full version of the SDK, contains biometrics & documents features2pod "BiometricSDK-biometry" # Contains only biometrics (finger+face) features3pod "BiometricSDK-finger" # Contains only finger features4pod "BiometricSDK-face" # Contains only face features without internal liveness checking mechanism5pod "BiometricSDK-document" # Contains only document features6pod "BiometricSDK-face_document" # Contains only face features without internal liveness checking mechanism & documents features
- Install dependencies with CocoaPods:
Shell1pod install
Note: If you are already using our repo, and you cannot resolve some dependency, try to update the specs:
Shell1pod repo-art update smartsdk
Manual installation
- Download the artifact manually from the artifactory (reference list)
- In the project editor, select the target to which you want to add a library or framework.
- Click Build Phases at the top of the project editor.
- Open the Embedded Binaries.
- Click the Add button (+).
- Click the Add Other button below the list.
- Add the following items:
BiometricSDK.framework- (optionally for face capture)
BiometricSDKFaceCapturePluginNormal.framework(or other face capturing plugin) - (optionally for face capture)
BiometricSDKAlgorithmPlugin_F6_5_LOW70.framework(or other matching algorithm plugin) - (optionally for finger capture new API)
FingerCaptureSDK.framework - (optionally for finger capture new API)
BiometricSDKUIFinger.framework
Manual download list
SDK variant | url |
|---|---|
| Face+Document+Fingerprint | BiometricSDK-biometry_document.tar.gz |
| Face+Fingerprint | BiometricSDK-biometry.tar.gz |
| Document | BiometricSDK-document.tar.gz |
| Face | BiometricSDK-face.tar.gz |
| Document+Face | BiometricSDK-face_document.tar.gz |
| Fingerprint | BiometricSDK-finger.tar.gz |
| Algorithms | BiometricSDK-algorithms.tar.gz |
| Plugins | BiometricSDK-plugins.tar.gz |
SDK Size
SDK variant | SDK size |
|---|---|
| Face+Document+Fingerprint (offline liveness + matching) | 47.35 MB |
| Face+Document+Fingerprint (offline liveness) | 39.12 MB |
| Face+Document+Fingerprint (backend) | 33.32 MB |
| Face+Fingerprint (offline liveness + matching) | 31.61 MB |
| Face+Fingerprint (offline liveness) | 23.38 MB |
| Face+Fingerprint (backend) | 17.58 MB |
| Face (offline liveness + matching) | 28.79 MB |
| Face (offline liveness) | 20.56 MB |
| Document | 20.20 MB |
| Face (backend) | 14.76 MB |
| Document+Face (offline liveness + matching) | 44.53 MB |
| Document+Face (offline liveness) | 36.30 MB |
| Document+Face (backend) | 30.50 MB |
| Fingerprint | 06.98 MB |
Analytics
Capture SDK offers a logging mechanism that collects analytics data about SDK usage and sends this data to IDEMIA's server in the EU. This data helps IDEMIA to improve Capture SDK and the likelihood of integrator success within the app. It is strongly recommended to use the analytics mechanism.
- Sending analytics data is enabled by default.
- You can enable or disable sending analytics data.
- You can choose to send analytics data only when you are connected to a Wi-Fi network, so as not to not use your cellular connection.
- Analytics data that IDEMIA collects contains only technical data.
- No sensitive personal data is collected.
- IDEMIA does not collect any images.
Analytics data that we collect include following information:
- Application name, bundle id, version
- Capture SDK and RemoteLogger libraries versions
- Capture SDK plugins versions
- Device model and operating system version
- Technical information about performed face, finger, and document capture (such as: used capture mode; timestamp; reason of error; time needed to perform a capture; quality of captured image; and light condition)
- Technical information about performed authentication and identification events (such as: used threshold, duration, and obtained score)
- Other technical information (such as: image compression, occurred errors, and SDK performance) that does not contain personal data
You can disable analytics reporting using the appropriate SDK method.
Analytics are enabled by default and data is sent through Wi-Fi and cellular connections to IDEMIA's server in Europe. You can switch to the server in US by calling:
Objective-C1[[BIORemoteLogger sharedInstance] setConfiguration:[BIORemoteLoggerConfiguration defaultUS]];
You can switch to Wi-Fi only mode with:
Objective-C1[BIORemoteLogger sharedInstance].wifiOnly = YES;
You can disable analytics as with:
Objective-C1[BIORemoteLogger sharedInstance].loggerDisabled = YES;
You should perform above calls before using the SDK, for example, in your app delegate.
License Manager
Remember: A valid license is required before using any feature of the SDK.
To have a valid license:
- Obtain an instance of
LicenseManagerviaprovideLicenseManager()method. - Call
activate()method on it.
Before Starting
Note: If you use the debug LKMS server without a SSL connection, you should add permission for the arbitrary loads in the transport security section in your Info.plist file. But it's highly recommended NOT to set this permission without the reason.
XML1<key>NSAppTransportSecurity</key>2 <dict>3 <key>NSAllowsArbitraryLoads</key>4 <true/>5 </dict>
New license manager
The License manager is the main entry point to use the SDK. You can manage licenses through LicenseManager.
Note: A valid license is required before using any feature of the SDK.
provideLicenseManager
This static method provides an instance of LicenseManager with a predefined LKMS profile. Any interaction with LicenseManager must be executed before starting capture.
Swift1let manager = LicenseManager.provideLicenseManager(profileId: LkmsProfileId, apiKey: LkmsApiKey, serverUrl: lkmsUrl)
Activating license
This method fetches the license if it's not locally stored and activates it. Additionally, in cases where the license has expired, the function retrieves a new license. This process is crucial and must occur each time the application starts.
Callback solution:
Swift1manager.activate { (error: LicenseActivationError) in2 if let error {3 // Failed to fetch or activate the license.4 } else {5 // License fetched and activated with success.6 }7 }
Async solution:
Swift1let result: Result<Void, LicenseActivationError> = await manager.activate()2 switch result {3 case .success:4 // License fetched and activated with success.5 case .failure(let error):6 // Failed to fetch or activate the license.7 }
LicenseActivationError
This is the information about why the license can not be activated.
Attribute | Description |
|---|---|
| type ActivationErrorType | The type of error that occurred during the license activation. |
| message String | The reason for the activation failure. |
ActivationErrorType
Attribute | Description |
|---|---|
profileExpired | The profile has expired, all licenses won’t work anymore. (Contact with support) |
activationCountExceeded | No more licenses can be consumed. (Contact with support) |
authenticationIssue | The credentials and/or profile are wrong. |
connectionIssue | Connection issue. (Check internet connection and server url) |
licenseSignatureVerificationFailed | Verification of the license signature is failed. Mostly this error is thrown when integrator switch between development and App Store builds. |
unknown | Unknown issue. |
Integration
The main component responsible for fingerprint images acquisition is FingerCaptureHandler. This component handles the whole scanning process including the system's camera API. In order to scan fingerprints an end-user needs to show their fingers in a camera sight. The handler processes the camera stream and as a result returns captured images.

- Import the framework header to your view controller.
Objective-C1#import <BiometricSDK/BiometricSDK.h>
- Add at least one
UIImageViewor subclasses to your layout. It will be used to preview the stream from your camera. It is not necessary for the capture to have a preview.
Objective-C1@property (weak, nonatomic) IBOutlet UIImageView *preview;
-
Check your license status here.
-
You also need to have the property for
FingerCaptureHandler. This object is handling all operations related to capturing.
Objective-C1[BIOSDK createFingerCaptureHandlerWithOptions:options withCompletionHandler:^(id<FingerCaptureHandler> captureHandler, NSError* error) {2 self.captureHandler = captureHandler;3 ...4 }];
- Set the delegate for
FingerCaptureHandlertoself.selfwill have to implement theFingerCaptureHandlerDelegateprotocol.
Objective-C1[BIOSDK createFingerCaptureHandlerWithOptions:options withCompletionHandler:^(id<FingerCaptureHandler> captureHandler, NSError* error) {2 self.captureHandler = captureHandler;3 self.captureHandler.delegate = self;4 ...5 }];
- After
FingerCaptureHandlerfinished its initialization, the preview view can be set.
Objective-C1[BIOSDK createFingerCaptureHandlerWithOptions:options withCompletionHandler:^(id<FingerCaptureHandler> captureHandler, NSError* error) {2 self.captureHandler = captureHandler;3 self.captureHandler.delegate = self;4 self.captureHandler.preview = self.preview;5 ...6 }];
- Now it can start capturing.
Objective-C1[BIOSDK createFingerCaptureHandlerWithOptions:options withCompletionHandler:^(id<FingerCaptureHandler> captureHandler, NSError* error) {2 self.captureHandler = captureHandler;3 self.captureHandler.delegate = self;4 self.captureHandler.preview = self.preview;5 [self.captureHandler startCaptureWithCompletionHandlerError:nil];6 }];
- Whenever the view controller disappears, resources (e.g. camera) need to be released.
Objective-C1- (void)viewDidDisappear:(BOOL)animated{2 [super viewDidDisappear:animated];3 [self.captureHandler destroy];4 }
Capture Options
FingerCaptureHandler is created using the set of options it contains. This set of options is represented by FingerCaptureOptions class.
It can be created with one of the available modes. For standard fingerprint acquisition FingerCaptureModeFingers mode should be used.
Once options object is created it's possible to set rest of options:
Parameter | Description | Recommended value |
|---|---|---|
livenessType | Determines the level of passive liveness check to consider fingerprints as acquired from a live person | medium |
hand | Specifies which hand is being scanned. | |
amputatedFingers | Specifies which fingers are missing. | |
threshold | The value indicates the threshold when a capture is considered as a good one. The higher the value is, the more restrictive the capture verification is. | 3500 |
captureTimeout | Time in seconds which will be taken by every scanning attempt to capture fingerprints. | 5 |
camera | Switch a camera which should be used for scanning. | REAR |
overlay | Turns on a dynamic overlay for fingers positioning. | ON |
UHDResolutionEnabled | (warning - experimental API) Specifies if camera should work in UHD/4K resolution. | NO |
ensureFourFingersScanning | This property ensures that the CaptureSDK scans exactly four fingers; any attempt to scan fewer than four fingers will result in an error and be rejected by the handler. If it is used with the amputatedFingers error will be thrown. Amputee mode and ensuring four-fingers scanning are mutually exclusive. | NO |
Lifecycle
FingerCaptureHandler consumes a lot of resources including a camera's resource, which is why it's very important to manage its lifecycle properly. It's recommended to create FingerCaptureHandler when is about to be used and release it when it's no longer needed.
Delegate Protocol
The SDK uses the delegate pattern. The updates about the scanning process are passed through the FingerCaptureHandlerDelegate's methods:
Method | Description |
|---|---|
fingerCaptureReceivedTrackingInfo | Method is called when there is new tracking information with the coordinates of the position of the fingers. |
capturedFingers | Method is called when the scanning is finished and there are fingers captured. |
capturedHand | Method is called when the scanning is finished and there is a hand captured. |
fingerCaptureReceivedCurrentDistance | Method is called when current distance between the fingers and the phone camera lens changed. |
fingerCaptureReceivedFeedback | Method is called when there is information/feedback to the user available. |
Execution Flow

Step | Description |
|---|---|
| 1 | It's recommended to bind the FingerCaptureHandler lifecycle with the ViewController's lifecycle. |
| 2 | On ViewController's viewWillAppear FingerCaptureHandler shall be created. |
| 3 | Once it's ready, it can start capturing. The capture can be started by calling the FingerCaptureHandler.startCapture(...) method. |
| 4 | During the scanning, it's possible to capture the fingers' positions using the captureTracking method from the FingerCaptureHandlerDelegate protocol. |
| 5 | Once the capture is done, the FingerCaptureHandler calls the capturedFingers method on the delegate with an array of the fingerprints' images. |
| 6 | Once the capture is done, the FingerCaptureHandler calls the capturedHand method on the delegate with an image of the successful frame. |
| 7 | On ViewController's viewDidDisappear FingerCaptureHandler shall be released. |
| 8 | FingerCaptureHandler is released with the destroy method. |
Fingerprints acquisition Implementation
- Point where the class is from at the top of the class when using a component where the
FingerCaptureHandleris used:
1 import BiometricSDK
- Add at least one UIImageView or subclass to the layout. The
FingerCaptureHandlerhandles and wraps the system's camera API. It displays a preview usingUIImageView. It is not necessary for the capture to have a preview.
1 @IBOutlet private var preview: UIImageView!
- Add a property for holding the strong reference to
FingerCaptureHandler, so it won't be released by ARC accidentally.
1 private var captureHandler: FingerCaptureHandler!
- Implement delegate methods, so it'll be possible to have a result of the capture.
1 extension ViewController: FingerCaptureHandlerDelegate {2 func capturedFingers(_ matchingImages: [BIOImage]?, withImagesToDisplay imagesToDisplay: [FingerImagePreview]?, with result: FingerCaptureResult?, withError error: Error?) {3 guard let matchingImages, !matchingImages.isEmpty, error == nil else {4 // Capture failed.5 return6 }7 // Capture finished successfully.8 // Use `matchingImages` for matching purposes.9 // Use `imagesToDisplay` for display purposes.10 }11 //...12 }
- Create
FingerCaptureHandlerinstance and assign the reference to the property:
1 BIOSDK.createFingerCaptureHandler(with: options) { [weak self] captureHandler, error in2 self?.captureHandler = captureHandler3 // ...4 }
- Set the delegate for
FingerCaptureHandlertoself. Theselfobject shall implementFingerCaptureHandlerDelegateprotocol.
1 BIOSDK.createFingerCaptureHandler(with: options) { [weak self] captureHandler, error in2 self?.captureHandler = captureHandler3 self?.captureHandler.delegate = self4 // ...5 }
- Set the preview:
1 BIOSDK.createFingerCaptureHandler(with: options) { [weak self] captureHandler, error in2 self?.captureHandler = captureHandler3 self?.captureHandler.delegate = self4 self?.captureHandler.preview = self?.preview5 // ...6 }
- After the
FingerCaptureHandlerfinished its initialization, the capturing can be stared by calling:
1 self.captureHandler?.startCapture(completionHandler: nil)
- Once the
FingerCaptureHandleris no longer needed, release it:
1 self.captureHandler?.destroy()
Result
As a result of fingerprints acquisition, you receive an array of BIOImage objects and a FingerCaptureResult object.
BIOImage
This object represents an image of a fingerprint. It can be converted into worldwide WSQ format commonly used for compressing fingerprint images with a built-in converter as below:
1let wsqImage = bioImage.dataByCompressingImage(toWSQRatio: 12, withScannerBlack: 0, andScannerWhite: 255)
If you need to show the image on screen, you can convert it to a UIImage:
1let uiImage = UIImage(from: bioImage)
FingerCaptureResult
This object contains additional information about the capture. Most importantly, it contains information about the liveness check result. If returned, the liveness status is BIOLivenessResultStatusLive, meaning that captured fingers belong to a real person, otherwise it means that captured fingers could have been scanned, for example from a printed photocopy.
Fast Authentication
Fast authentication mode is a special type of capture mode used only for authentication of an end-user that was previously enrolled. During the enrollment process, it's possible to obtain BIOTemplate objects. The BIOTemplate objects are reference templates that represent captured fingerprints and can be later used for authentication.
One day of performing an authentication is to capture the fingerprints of an end-user in the same way as it's done during the enrollment process and then manually compare the BIOTemplate objects to those obtained during the enrollment. However, that could take longer as the standard finger capture can take up to few seconds. In fast authentication mode it's possible to provide those reference templates before a capture is started while the SDK searches for a match specifically only with those templates, which is a much faster process.
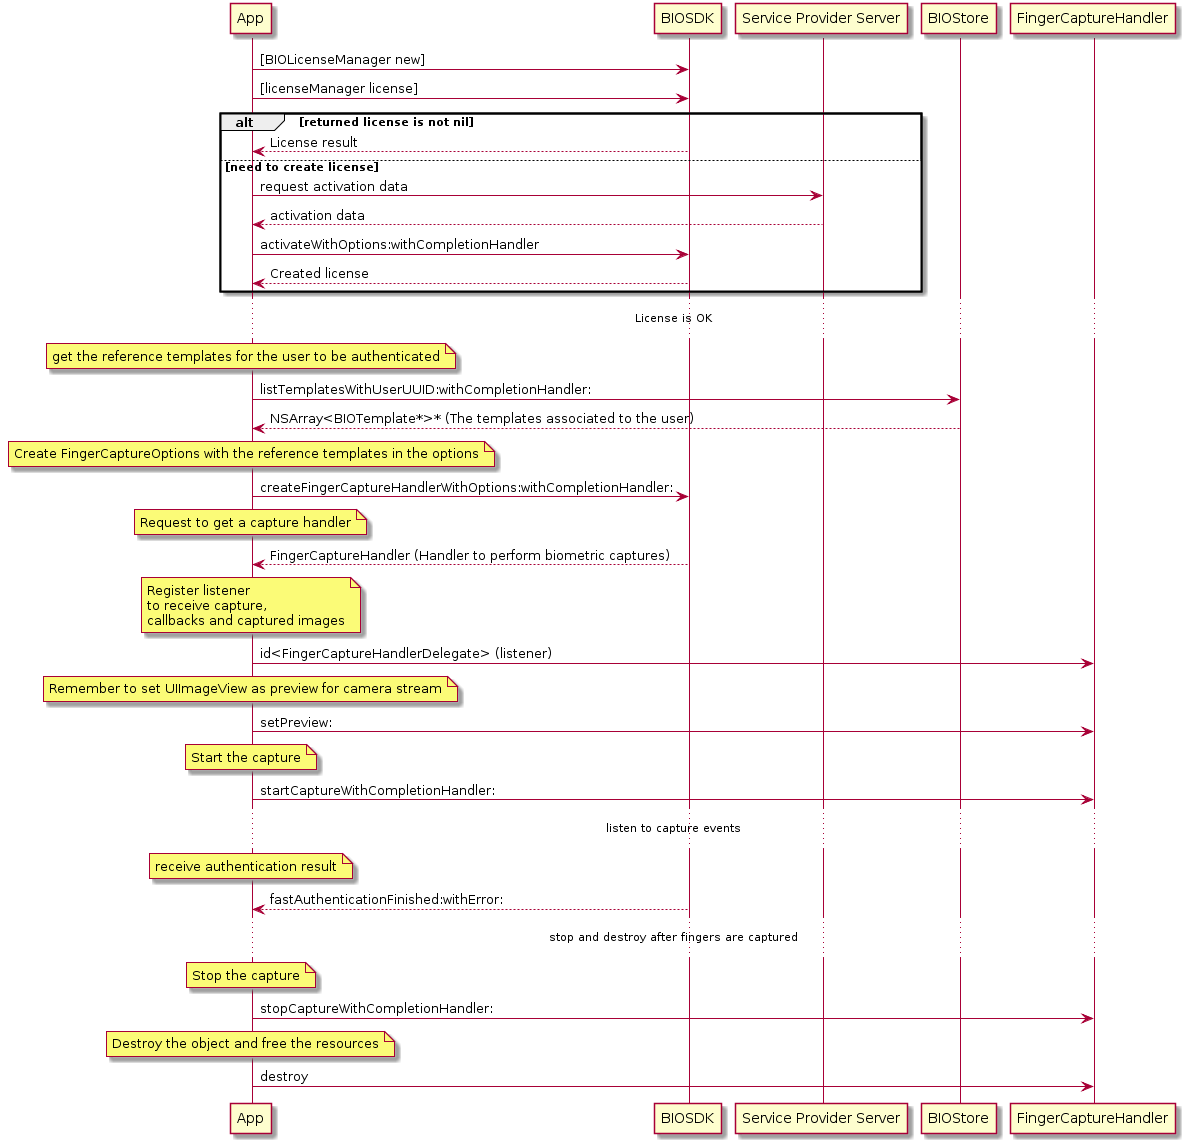
Execution Flow
Below is the generic execution flow to perform a fast authentication. First, the reference templates of the end-user that should be authenticated need to be provided in FingerCaptureOptions to the FingerCaptureHandler. With those, the FingerCaptureHandler will capture the fingerprints and compare them with the reference templates until it has a match. When this happens, the FingerCaptureHandler will return the result. If this doesn't happen and the timeout value is exceeded, then authentication will fail.
Capture Options
To use fast authentication mode, use the same FingerCaptureOptions object used for a normal finger capture. However, to perform fast authentication, initialize it with one of following values:
FingerCaptureModeAuthenticationfor the one hand
Set the referenceTemplates property of the FingerCaptureOptions with reference templates and the captureTimeout property to the desired maximum number of seconds (recommended value:10) for the capture.
Optionally, set a custom value in the threshold property with a minimum score value (default and recommended value is 3500) to obtain during the fast authentication process.
Implementing a Fast Authentication Use Case
To perform a fast authentication implement the following steps.
-
Get the reference templates of the end-user you're trying to authenticate stored in
BIOStoreduring enrollment of that end-user with following method:1func fingerTemplates(for userUuid: String, completion: @escaping ([BIOTemplate]?) -> Void) {2 BIOStore.listTemplates(withUserUUID: userUuid, withModality: BIOModalityFrictionRidge) { (referenceTemplates, _) in3 completion(referenceTemplates)4 }5} -
With obtained reference templates, create
FingerCaptureOptionswith a chosenFingerCaptureMode:1let options = FingerCaptureOptions(mode: .authentication, hand: .right)2options.captureTimeout = 103options.overlay = .ON4options.referenceTemplates = templates -
Use the newly created options to create a
FingerCaptureHandlerand set its delegate:1BIOSDK.createFingerCaptureHandler(with: options) { captureHandler, error in2 guard let captureHandler = captureHandler, error == nil else {3 // Error, cannot create capture handler.4 return5 }6 // Save a reference to created capture handler.7 self.captureHandler = captureHandler89 // Set delegate to receive fast authentication result.10 self.captureHandler?.delegate = self1112 // Set the preview used for displaying image from the camera.13 self.captureHandler?.preview = self.previewImageView1415 // Start the capture.16 self.captureHandler?.startCapture(completionHandler: { error in17 guard error == nil else {18 // Error, cannot start the capture.19 return20 }21 // Capture started.22 })23} -
Implement the delegate method to receive the fast authentication result:
1// When fast authentication is finished this callback returns information if it was successful.2func fastAuthenticationFinished(_ authenticationResult: BIOAuthenticationResult?, withError error: Error?) {3 // Check for any capture error.4 guard let authenticationResult = authenticationResult, error == nil else {5 // Error, capture failed.6 return7 }89 guard authenticationResult.matchesSuccessfully else {10 // Error, fast authentication matching with reference templates failed.11 return12 }1314 // User has been authenticated successfully with provided reference templates.15 print("Fast authentication score: \(authenticationResult.score)")16}
Result
BIOAuthenticationResult
This object represents an authentication result.
Parameter | Description |
|---|---|
| score long | The authentication score. |
| matchesSuccessfully BOOL | True if the score is bigger than the threshold. |
Finger Matching
Finger matching is a process that allows the comparison of fingerprints captured previously, for example during and end-user enrollment process, with other fingerprints perhaps captured during an end-user authentication process. For matching to be successful, the BIOTemplate objects need to have the same biometric modality. With finger templates that's BIOModalityFrictionRidge.
Execution Flow
-
Create the
BIOMatcherHandler. -
Prepare the
BIOBiometricCandidateobject with candidate templates which usually are created during the authentication process from capturedBIOImageobjects. -
Prepare the
BIOBiometricReferenceobject with reference templates which usually are previously saved to the database during the enrollment process. -
Upon successful matching, a
BIOAuthenticationResultobject is delivered with information.
Implementing Finger Matching
To perform finger matching, implement the steps below.
-
Create the matching handler:
1BIOSDK.createMatcherHandler(with: BIOMatcherHandlerOptions()) { (handler, error) in2 guard let handler = handler, error == nil else {3 // Error, cannot create matcher handler.4 return5 }6 // Save a reference to created matcher handler.7 self.matcherHandler = handler8} -
Prepare candidate templates for comparison with the reference templates. For the standard authentication process, create the templates those for all of the captured
BIOImageobjects with a function:1func detectBiometrics(for image: BIOImage, completion: @escaping ([BIOTemplate]?) -> Void) {2 let options = BIODetectBiometricOptions(location: image.biometricLocation, withModality: BIOModalityFrictionRidge)3 self.matcherHandler.detectBiometric(with: options, with: image) { (templates, error) in4 completion(templates)5 }6} -
Prepare the
BIOBiometricCandidateobject after all of the candidate templates have been obtained:1let candidate = BIOBiometricCandidate()2candidate.addTemplates(templates) -
Prepare the reference templates. For the standard authentication process, get the previously stored templates from the
BIOStorewith a function such as in the example below:1func fingerTemplates(for userUuid: String, completion: @escaping ([BIOTemplate]?) -> Void) {2 BIOStore.listTemplates(withUserUUID: userUuid, withModality: BIOModalityFrictionRidge) { (referenceTemplates, _) in3 completion(referenceTemplates)4 }5} -
Prepare the
BIOBiometricReferenceobject when all of the reference templates have been obtained:1let reference = BIOBiometricReference(userUUID: userUuid)2reference.addTemplates(referenceTemplates) -
Compare a candidate with the reference to verify if there is a match:
1let options = BIOAuthenticationOptions(modality: BIOModalityFrictionRidge)2self.matcherHandler.authenticate(with: options, with: candidate, with: reference) { (authenticationResult, error) in3 guard let authenticationResult = authenticationResult, error == nil else {4 // Error, authentication failed.5 return6 }7 guard authenticationResult.matchesSuccessfully else {8 // Error, matching with reference templates failed.9 return10 }1112 // User has been authenticated succesfully with provided reference templates.13 print("Authentication score: \(authenticationResult.score)")14}
Parameters
Parameter | Description |
|---|---|
| authenticationOptions BIOAuthenticationOptions | The options used to perform the authentication. The main purpose of this object is to hold the threshold for the score that needs to be exceeded in order to accept a candidate. |
| biometricCandidate BIOBiometricCandidate | It contains the list of templates that you want to match. |
| biometricReference BIOBiometricReference | It contains the list of templates you want to use as a reference, each one has the userUUID to which they belong. |
Result
BIOAuthenticationResult
This object represents an authentication result.
Parameter | Description |
|---|---|
| score long | The authentication score. |
| matchesSuccessfully BOOL | True if the score is bigger than the threshold. |
Capture Errors
These are the errors returned after a finger capture attempt fails:
Code | Description | When | Why |
|---|---|---|---|
BIOCapturingErrorBadCaptureFingers | Fail to capture fingers | Capture of fingers went wrong | Couldn't find fingerprints on a captured image. (See "Note 1") |
BIOCapturingErrorBadCaptureHand | Fail to capture hand | Capture of hand went wrong | Wrong hand has been scanned |
Note 1:
Finger capture may also fail with a BIOCapturingErrorBadCaptureFingers error when the verification mechanism refuses to accept the scanned fingerprints. It can happen when there are no actual fingerprints scanned or the quality of scanned images is too low or the matching threshold value is set too high.
Note 2:
When the liveness check detects fraud, no error is returned. Liveness status can be found under captureInfo.liveness, and is returned with the following callback:
1func capturedFingers(_ images: [BIOImage]?, withImagesToDisplay imagesToDisplay: [FingerImagePreview]?, with captureInfo: FingerCaptureResult?, withError error: Error?)
Storing Biometrics Data
BIOStore is responsible for managing the biometrics data on a device's persistent memory. It can be used when there is no other external database that can store such information. It consists of group of static methods that can be used to perform basic database operations on biometric templates and end-users.
Template Storage
Biometric data gathered from each captured finger can be persistently stored as a BIOTemplate object. BIOStore provides methods for saving and managing saved templates, which can be used to:
-
Perform basic operations as add, get, update, remove template or remove template associated to any one end-user
-
List all templates stored in the database or query templates assigned to a certain end-user with a given UUID
End-user Storage
BIOUser holds information about the ownership of the biometric templates. An end-user's unique UUID is paired with the end-user's owned templates. BIOStore provides methods for saving and managing saved end-users, which can be used to:
-
Perform basic operations as add, get, update, remove or list end-users
-
Retrieve end-user that is associated with a given template UUID.
Saving Templates
To save templates using BIOStore implement the following steps. This assumes the finger capture is successful and biometric templates were acquired by using BIOMatcherHandler on an array of captured finger images.
- Create the
BIOUserobject.
1let bioUser = BIOUser()2bioUser.uuid = UUID().uuidString3bioUser.name = "User Name"
- Add the end-user to
BIOStore.
1BIOStore.add(bioUser, withCompletionHandler: nil)
- For each template set the end-user UUID and add it to
BIOStore.
1for template in self.templates {2 template.uuidUser = uuid3 BIOStore.add(template) { (uuid, error) in4 // Handle completion5 }6}
This adds the templates with the associated end-user to persistent storage.
New finger capture API
Introduction
In order to make integration of the SDK easier and more intuitive - new API for Finger Capture has been delivered. It is based on use cases that are self-explaining which provide specific information depending on a given use case. This allows integrator to focus on working with the data provided by the SDK rather than on SDK configuration.
NOTE: As for now, the new API supports only latent use case.
Integration
Integration of SDK consists of three steps:
- Activating license and camera permission.
- Adding FingerCaptureView to the layout.
- Setting up capture.
Adding FingerCaptureView to the layout
It inherits from UIView and has to be used as a preview on the capture's UI. FingerCaptureView is also used to start finger capture and cancel it if needed. So this is not only a capture preview but also entry point to the SDK.
Swift1class FingerCaptureSDK.FingerCaptureView {2 func setup(useCase: UseCase, uiSettings: UISettings?)3 func start()4 func cancel()5}
In project that uses storyboards FingerCaptureView (from FingerCaptureSDK module) should be added as an IBOutlet to a layout of the view used for finger capture.
Swift1@IBOutlet private weak var captureView: FingerCaptureView!
Setting up capture
In order to start capture, it is essential to create a specific use case instance. Each use case ahs a settings property that contains session configuration and set of delegates that will be used to handle callback methods. Use cases and delegates are described in more detail in the next paragraphs - Use Cases, Delegates.
To easily customize the look and feel of finger capture, an optional parameter UISettings can be created additionally. More on that parameter here.
Once these three steps are satisfied, theFingerCaptureView can be set up by passing use case instance and optionally UI settings as parameters. After setting up a captureView, capture can be started by calling start() method. Delegate attached to the use case will receive data from the capture.
Swift1import FingerCaptureSDK
Swift1let useCase = // create use case2 let uiSettings = // optionally create ui settings3 self.captureView.setup(with useCase: useCase, uiSettings: uiSettings)4 self.captureView.start()
Capture process can be canceled by calling cancel() method.
Use Cases
Capture settings of FingerCaptureSDK are done by using proper, predefined configuration, designed for specific use case. In this way capture configuration is more intuitive and less confusing. Below you can find list of available use cases.
LatentUseCase
This use case can be used to capture a fingerprint of secretion of the skin. The fingerprint will be returned in PNG format. To create LatentUseCase, following properties must be provided:
LatentUseCase field | Description |
|---|---|
| settings LatentCaptureSettings | Latent capture settings. |
| delegates LatentCaptureDelegates | Delegates used for handling latent capture callbacks. |
Swift1let delegates = LatentCaptureDelegates(/** described in Delegates section **/)2 let useCase = LatentUseCase(settings: LatentCaptureSettings(timeout: 10), delegates: delegates)
LatentCaptureSettings
Field | Description |
|---|---|
| timeout UInt | Capture timeout. |
UISettings
Optional parameter that can contain configuration of UI elements visibility used in finger capture process displayed on FingerCaptureView. All UI elements are enabled by default.
UISettings field | Description |
|---|---|
| fingerCaptureSettings FingerCaptureUISettings | Custom UI settings for finger capture. |
Swift1let uiSettings = FingerCaptureUISettings(tappingFeedbackSettings: TappingFeedbackUISettings(show: true),2 distanceIndicatorSettings: DistanceIndicatorUISettings(show: true),3 feedbackSettings: FingerFeedbackUISettings(show: true),4 progressBarSettings: ProgressBarUISettings(show: true),5 fingerOverlaySettings: FingerOverlaysUISettings(show: true))
Delegates
This section describes delegates available for specific use cases within new API for finger capture. Please remember that all UI operations should be performed on main thread.
Capture Delegates
Delegates are used as a mechanism to return information about capture process and status. To receive such information simply set an instance of your class as a delegate and implement methods from the protocol. Delegates are dedicated for specific use cases. However, all use cases have common 3 general delegates, which are as follows:
Finger feedback delegate
Provides information whether the distance between fingers (fingerprints) and the phone is correct. Works only with calibrated devices. This listener is optional and is useful when UISettings are not provided.
Swift1func captureFeedbackReceived(_ info_: FingerCaptureInfo)
Method called after feedback info is available. Provides FingerCaptureInfo which is an enum with possible messages. Those feedback messages can be mapped and displayed to the user on the UI. For example, tooFar can be mapped to "Move your fingers closer". More examples can be found in FingerSampleApp.
FingerCaptureInfo
Finger capture (distance) feedback for the end-user.
Attribute | Description |
|---|---|
| optimalDistance | Indicates that the distance between the fingerprint and the phone lens is optimal. |
| tooClose | Indicates that the phone lens is too close from the fingerprint and should be moved further. |
| tooFar | Indicates that the phone lens is too far from the fingerprint and should be moved closer. |
Finger tracking delegate
Provides coordinates of users finger positions on screen. For latent use case it provides rectangle in which the latents should be visible on the preview.
Swift1func captureInfoReceived(_ trackingInfo: [FingerBox])
Delegate provides a list of FingerBox that has coordinates and dimensions of a frame that can be drawn on the preview image, indicating finger location.
FingerBox
Parameter | Description |
|---|---|
| x Int | Coordinate of the left side of the rectangle top. |
| y Int | Coordinate of the top of the rectangle right. |
| width Int | Rectangle width. |
| height Int | Rectangle height. |
| previewWidth Int | Width of the preview. |
| previewHeight Int | Height of the preview. |
| orientation Int | Rectangle rotation value, in degrees. |
Capture Distance Delegate
Returns information associated with indication of optimal distance range between the phone lens and the fingerprint.
Swift1func captureDistanceRangeInformationReceived(_ rangeResult: CaptureDistanceRangeResult)
CaptureDistanceRangeResult
This indicates whether the distance of the fingers (fingerprints) distance to the phone camera lens is available and provides optimal distance range for the device.
Parameter | Description |
|---|---|
| range CaptureDistanceRange* | The distance range object if the device is calibrated. |
| unavailabilityReason NSError* | The distance feedback feature unavailability reason if the device is not calibrated. |
CaptureDistanceRange
This represents the range of distances between the fingers (fingerprints) and the phone camera lens.
Parameter | Description |
|---|---|
| rangeMin CGFloat | Minimum value that may be returned in CurrentCaptureDistance.value. Should be equal to 0.0 |
| optimalMin CGFloat | Lower boundary of optimal distance between the phone and the fingers (fingerprints) |
| optimalMax CGFloat | Upper boundary of optimal distance between the phone and the fingers (fingerprints) |
| rangeMax CGFloat | Maximum value that may be returned in CurrentCaptureDistance.value. Should be equal to 1.0 |
Swift1func currentCaptureDistanceChanged(to currentCaptureDistance: CurrentCaptureDistance)
CurrentCaptureDistance
This represents current fingers (fingerprints) distance to the phone camera lens.
Parameter | Description |
|---|---|
| value CGFloat | The distance between the fingers (fingerprints) and the camera. Its range is between rangeMin and rangeMax values in FingerCaptureDistanceRange. |
Latent Capture Delegates
Below delegates are meant only for latent use case.
Swift1let fingerDelegates = FingerCaptureDelegates(currentDistanceDelegate: self, feedbackDelegate: self, trackingDelegate: self)2 let delegates = LatentCaptureDelegates(resultDelegate: self, torchDelegate: self, fingerCaptureDelegates: fingerDelegates)
Torch Delegate
Provides TorchController that can be used to control the device torch.
Swift1func torchControllerProvided(_ torchController: TorchController)
NOTE: After capture finished, the torch is automatically turned off.
TorchController
Parameter | Description |
|---|---|
| torch Torch | Allows to turn on or off device torch. |
Torch
Represents device torch status.
Type | Description |
|---|---|
| ON | Torch is on or will be turned on |
| OFF | Torch is off or will be turned off. |
Latent Result delegate
Delegate that has one method, which is being called after latent capture is finished.
Swift1func captureDidFinish(with result: LatentSuccess)
It provides LatentSuccess parameter with latent image. No other callback will occur after this method.
LatentSuccess
Parameter | Description |
|---|---|
| image LatentImage | Contains image in PNG format with width and height. |
LatentImage
Parameter | Description |
|---|---|
| width Int | Image width. |
| height Int | Image height. |
| data Data | PNG image. |
Swift1func captureDidFail(with error: CaptureError)
It provides the CaptureError parameter to inform why the capture failed. No other callback will occur after this method.
Errors
CaptureError object contains a lot of useful information that helps in handling a failed flow.
Parameter | Description |
|---|---|
| type ErrorType | Type of an error. High level information what goes wrong. Find types description below. |
| code Int | Special code dedicated for particular case. Very helpful in L2, L3 troubleshooting. |
| message String | Message with error description. |
ErrorType
Type | Description |
|---|---|
| timeout | Timeout occured during the flow. |
| badCapture | Capture failed. Fingerprint was not detected or some kind of internal issue appeared. |
| canceled | Capture has been cancelled by the end user. |
| invalidLicense | The LKMS license is invalid. |
| unknown | Unknow type of error. Also used as default type for few cases. |
Enabling CaptureSDK logs
To assist with debugging in CaptureSDK, you can enable internal logging to improve issue resolution.
Note: Only the captureHandler API supports displaying logs. In the Use Case API are currently unavailable.
How to enable logging
Set the desired log level using the logLevel property, available in all capture options.
Recommended: Use BIOLogLevelDebug for detailed logs. Other log levels exist but are generally not suitable for integrators.
Swift1let options = DocumentCaptureOptions(mode: .veryLowID)2options.logLevel = BIOLogLevelDebug
Once enabled, additional logs will appear in the Xcode console.
ImageUtils
SDK provides methods to perform various operations on BIOImage such as for example converting BIOImage to various image formats. Those operations are described below.
Compress BIOImage to JPEG
This is the method of the BIOImage class that converts the BIOImage object to NSData object with JPEG file with default compression quality (90% for finger images, 80% for face images, 70% for document images). Created JPEG will contain capture maker note data inside EXIF metadata containing information such as for example SDK version used for capturing the image.
Objective-C1- (NSData *)toJPEG;
Return | Description |
|---|---|
| NSData* | JPEG file binary data. |
Compress BIOImage to JPEG with custom quality
This is the method of the BIOImage class that converts the BIOImage object to NSData object with JPEG file with given compression quality level. Created JPEG will contain capture maker note data inside EXIF metadata containing information such as for example SDK version used for capturing the image.
Objective-C1- (NSData *)toJPEGWithQuality:(CGFloat)quality;
Parameter | Description |
|---|---|
| quality CGFloat | Compression quality in range [0, 1]. |
Return | Description |
|---|---|
| NSData* | JPEG file binary data. |
Get UIImage from BIOImageFromUIImage
This is the method of UIImage (BIOImage) extension that converts a BIOImage to a UIImage.
Objective-C1+ (UIImage*)imageFromBIOImage:(BIOImage*)bioImage
Parameter | Description |
|---|---|
| image BIOImage* | BIOImage to convert to UIImage. |
Return | Description |
|---|---|
| BIOImage* | UIImage from BIOImage. |
Get BIOImage from UIImage
This is the method of the BIOImage (ImageGetters) extension that converts UIImage to BIOImage.
Objective-C1+ (BIOImage*)BIOImageFromUIImage:(UIImage*)image;
Parameter | Description |
|---|---|
| image UIImage* | UIImage to convert to BIOImage. |
Return | Description |
|---|---|
| BIOImage* | BIOImage from UIImage. |
Create a BIOImage with Different Color Space
This is the method of the BIOImage (ImageGetters) extension that converts a BIOImage to another BIOImage with a different color space.
Objective-C1- (BIOImage*)BIOImageWithColorSpace:(BIOColorSpace)colorSpace;
Parameter | Description |
|---|---|
| colorSpace BIOColorSpace | Color space wanted for the new BIOImage. |
Return | Description |
|---|---|
| BIOImage* | BIOImage with the color space provided. |
Compress Image with Quality to NSData
This is a method of BIOImage (BIOResize) extension that compresses an image to a NSData* with determined quality.
Objective-C1- (NSData*)dataByCompressingImageWithQuality:(uint32_t)quality
Parameter | Description |
|---|---|
| quality uint32_t | Quality of the compression (value between 1 and 100). |
Return | Description |
|---|---|
| NSData* | Final data with compression applied. |
Compress Image with Quality to BIOImage
This is the method of the BIOImage (BIOResize) extension to compresses an image to a BIOImage* with determined quality.
Objective-C1- (BIOImage*)imageByCompressingImageWithQuality:(uint32_t)quality
Parameter | Description |
|---|---|
| quality uint32_t | Quality of the compression (value between 1 and 100.) |
Return | Description |
|---|---|
| BIOImage* | Final BIOImage with compression applied. |
Compress Image from Size in Kilobytes to NSData
This is the a method of the BIOImage (BIOResize) extension to compress an image to a NSData* with a determined final size in kilobytes.
Objective-C1- (NSData*)dataByCompressingImageToSizeInKilobytes:(CGFloat)sizeInKilobytes
Parameter | Description |
|---|---|
| sizeInKilobytes CGFloat | Final size in kilobytes. |
Return | Description |
|---|---|
| NSData* | Final data with compression applied. |
Compress Image from Size in Kilobytes to BIOImage
This is a the method of the BIOImage (BIOResize) extension to compress an image to a BIOImage* with a determined final size in kilobytes.
Objective-C1- (BIOImage*)imageByCompressingImageToSizeInKilobytes:(CGFloat)sizeInKilobytes
Parameter | Description |
|---|---|
| sizeInKilobytes CGFloat | Final size in kilobytes. |
Return | Description |
|---|---|
| BIOImage* | Final BIOImage with compression applied. |
Compress Image from WSQ Ratio to NSData
This is the method of the BIOImage(BIOResize) extension to compress an image from WSQ to a NSData* with a determined WSQ ratio. Only fingerprint images should be used in this method.
Objective-C1- (NSData*)dataByCompressingImageToWSQRatio:(CGFloat)ratio withScannerBlack:(Byte)scannerBlack andScannerWhite:(Byte)scannerWhite;
Parameter | Description |
|---|---|
| ratio CGFloat | WSQ ratio for the compression (value between 1.6 and 8000, recommended value between 12 and 15). |
| scannerBlack Byte | Black calibration value (if unknown use 0). |
|scannerWhite Byte | White calibration value (if unknown use 255).
Return | Description |
|---|---|
| NSData* | Final data with compression applied. |
Compress Image from WSQ Ratio to BIOImage
This is the method of the BIOImage (BIOResize) extension that compresses an image to a BIOImage* with a determined WSQ ratio. Only fingerprint images should be used in this method.
Objective-C1- (BIOImage*)imageByCompressingImageToWSQRatio:(CGFloat)ratio withScannerBlack:(Byte)scannerBlack andScannerWhite:(Byte)scannerWhite;
Parameter | Description |
|---|---|
| ratio CGFloat | WSQ ratio for the compression (value between 1.6 and 8000, recommended value between 12 and 15). |
|scannerBlack Byte | Black calibration value (if unknown use 0).
|scannerWhite Byte | White calibration value (if unknown use 255).
Return | Description |
|---|---|
| BIOImage* | Final BIOImage with compression applied. |
Compress Image from JPEG2000 to NSData
This is the method of the BIOImage (BIOResize) extension that compresses and image to a NSData* in JPEG2000 format with a determined maximum size in kilobytes. Only fingerprint images should be used in this method.
Objective-C1- (NSData*)dataByCompressingImageToJPEG2000InKilobytes:(CGFloat)maximumSizeInKilobytes
Parameter | Description |
|---|---|
| maximumSizeInKilobytes CGFloat | Maximum size in kilobytes. |
Return | Description |
|---|---|
| NSData* | Final data with compression applied. |
Compress Image from JPEG2000 to BIOImage
This is the method of the BIOImage (BIOResize) extension that compresses an image to a JPEG2000 in a BIOImage* format with a determined maximum size in kilobytes. Only fingerprint images should be used in this method.
Objective-C1- (BIOImage*)imageByCompressingImageToJPEG2000InKilobytes:(CGFloat)maximumSizeInKilobytes
Parameter | Description |
|---|---|
| maximumSizeInKilobytes CGFloat | Maximum size in kilobytes. |
Return | Description |
|---|---|
| BIOImage* | Final BIOImage with compression applied. |
Crop Image Region (document)
This is the method of the BIOImage (RegionCropping) extension to crop a BIOImage to a determined region.
Objective-C1+ (BIOImage*)cropImage:(BIOImage*)bioImage toRegion:(BIODocumentTrackingInformation*)documentTrackingInfo;
Parameter | Description |
|---|---|
| bioImage BIOImage* | BIOImage to be cropped. |
| documentTrackingInfo BIODocumentTrackingInformation* | Region coordinates that the BIOImage will be cropped to. |
Return | Description |
|---|---|
| BIOImage* | Final BIOImage with the result of the crop, or nil if an error occurred. |
Crop Image Rect
This is the method of the BIOImage (Cropping) extension to crop a BIOImage to a determined rectangle.
Objective-C1- (instancetype _Nullable)cropToRect:(CGRect)rect withMargin:(CGFloat)margin;2- (instancetype _Nullable)cropToRect:(CGRect)rect; // margin = 0
Parameter | Description |
|---|---|
| rect CGRect | Region coordinates that the BIOImage will be cropped to. |
| margin CGFloat | Optional cropping margin |
Return | Description |
|---|---|
| BIOImage* | Final BIOImage with the result of the crop, or nil if an error occurred. |
Crop Image Points
This is the method of the BIOImage (Cropping) extension to crop a BIOImage to a determined rectangle determined by points.
Objective-C1- (instancetype _Nullable)cropToRegionWithPoint1:(CGPoint)point1 point2:(CGPoint)point2 point3: (CGPoint)point3 point4:(CGPoint)point4 withMargin:(CGFloat)margin;2- (instancetype _Nullable)cropToRegionWithPoint1:(CGPoint)point1 point2:(CGPoint)point2 point3: (CGPoint)point3 point4:(CGPoint)point4; // margin = 0
Parameter | Description |
|---|---|
| point1 CGPoint | First point of the region coordinates that the BIOImage will be cropped to. |
| point2 CGPoint | Second point of the region coordinates that the BIOImage will be cropped to. |
| point3 CGPoint | Third point of the region coordinates that the BIOImage will be cropped to. |
| point4 CGPoint | Fourth point of the region coordinates that the BIOImage will be cropped to. |
| margin CGFloat | Optional cropping margin |
Return | Description |
|---|---|
| BIOImage* | Final BIOImage with the result of the crop, or nil if an error occurred. |