This is the main entry point that allows you to use the SDK.
Introduction
The Capture SDK is targeted to developers who want to use the IDEMIA biometric technologies within their mobile apps.
The main features are:
- Biometric captures
- Biometric coding
- Biometric authentication and identification
- Identity documents reading
Please refer to Release Notes to see the list of improvements and fixed issues.
Prerequisites
Skills Required
The integration tasks shall be done by developers with knowledge of:
- Xcode
- Objective-C/Swift
- SDK is not supporting Swift 6 language mode.
- iOS (min version is 15.0)
- (optional) cocoapods
Resources Required
Integration should be performed on a Mac.
The tools required are:
- Xcode that support iOS 15
- iOS device (simulator is not supported)
Licenses Required
Depending of which declination of the library is used the licenses required are:
-
Biometry + Document:
- MORPHOFACS
- VERIF
- IDENT
- MIMA
- MSC_CORE
- MSC_LIVENESS
-
Biometry:
- MORPHOFACS
- VERIF
- IDENT
- MIMA
- MSC_CORE
- MSC_LIVENESS
-
Document:
- MIMA
- MSC_CORE
Note: To enable the feature for video dump you will need also:
- MSC_DUMP
Sample Project
The sample project is provided along with this documentation.
Getting Started
Components
The SDK is composed of six different components:
- LicenseManager: Object responsible for handling the license.
- FaceCaptureHandler: Handles the capture of the face biometrics through the camera of the device.
- FingerCaptureHandler: Handles the capture of the finger biometrics through the camera of the device.
- BioMatcherHandler: Handles the biometric coding and matching.
- BioStoreDB: Repository to store biometric templates (This component is optional, just in case you don’t want to implement your own database).
- DocumentCaptureHandler: Handles the document reading features (Like reading MRZ documents).
- ImageUtils: Handle the images format conversion, in case the integrator needs to change the image format or import an image.
SDK Variants
The SDK comes in six different variants.
-
Full SDK: It contains all the features of the SDK. Includes components: LicenseManager, FaceCaptureHandler, FingerCaptureHandler, BioMatcherHandler, BioStoreDB, DocumentCaptureHandler, ImageUtils. You can integrate it into your project by specifying it in your Podfile:
pod 'BiometricSDK'. -
Biometry variant: It contains all biometric features including face and finger capture and also biometric coding and matching used for liveness checking. Includes components: LicenseManager, FaceCaptureHandler, FingerCaptureHandler, BioMatcherHandler, BioStoreDB, ImageUtils. You can integrate it into your project by specifying it in your Podfile:
pod 'BiometricSDK-biometry'. -
Document variant: It contains only document capture features. Includes components: LicenseManager, DocumentCaptureHandler, ImageUtils. You can integrate it into your project by specifying it in your Podfile:
pod 'BiometricSDK-document'. -
Finger variant: It contains only finger capture features including biometric coding and matching used for finger liveness checking. Includes components: LicenseManager, FingerCaptureHandler, BioMatcherHandler, BioStoreDB, ImageUtils. You can integrate it into your project by specifying it in your Podfile:
pod 'BiometricSDK-finger'. -
Face variant: It contains only face capture features without biometric coding and matching, so for liveness checking you need to use external server. Offline liveness checking is not available. Includes components: LicenseManager, FaceCaptureHandler, BioStoreDB, ImageUtils. You can integrate it into your project by specifying it in your Podfile:
pod 'BiometricSDK-face'. -
Face+document variant: It contains only face capture features without biometric coding and matching, so for liveness checking you need to use external server. Offline liveness checking is not available. Additionally it contains also document capture features. Includes components: LicenseManager, FaceCaptureHandler, BioStoreDB, DocumentCaptureHandler, ImageUtils. You can integrate it into your project by specifying it in your Podfile:
pod 'BiometricSDK-face_document'.
Analytics
Capture SDK offers a logging mechanism that collects analytics data about SDK usage and sends this data to IDEMIA's server in the EU. This data helps IDEMIA to improve Capture SDK and the likelihood of integrator success within the app. It is strongly recommended to use the analytics mechanism.
- Sending analytics data is enabled by default.
- You can enable or disable sending analytics data.
- You can choose to send analytics data only when you are connected to a Wi-Fi network, so as not to not use your cellular connection.
- Analytics data that IDEMIA collects contains only technical data.
- No sensitive personal data is collected.
- IDEMIA does not collect any images.
Analytics data that we collect include following information:
- Application name, bundle id, version
- Capture SDK and RemoteLogger libraries versions
- Capture SDK plugins versions
- Device model and operating system version
- Technical information about performed face, finger, and document capture (such as: used capture mode; timestamp; reason of error; time needed to perform a capture; quality of captured image; and light condition)
- Technical information about performed authentication and identification events (such as: used threshold, duration, and obtained score)
- Other technical information (such as: image compression, occurred errors, and SDK performance) that does not contain personal data
You can disable analytics reporting using the appropriate SDK method.
Analytics are enabled by default and data is sent through Wi-Fi and cellular connections to IDEMIA's server in Europe. You can switch to the server in US by calling:
Objective-C1[[BIORemoteLogger sharedInstance] setConfiguration:[BIORemoteLoggerConfiguration defaultUS]];
You can switch to Wi-Fi only mode with:
Objective-C1[BIORemoteLogger sharedInstance].wifiOnly = YES;
You can disable analytics as with:
Objective-C1[BIORemoteLogger sharedInstance].loggerDisabled = YES;
You should perform above calls before using the SDK, for example, in your app delegate.
Project Configuration
Before using our SDK you need to add Privacy - Camera Usage Description (NSCameraUsageDescriptionkey) to the Info.plist of your application as it will need to use the camera.
Adding the Biometric Capture SDK Framework
We serve our artifacts with the artifactory. As an integrator you can choose one the methods of adding our framework to your project:
- using CocoaPods
- manually
Use CocoaPods (along with cocoapods-artplugin)
If you don't already have the CocoaPods with the Artifactory tool, install it by running the following command:
Bash1gem install cocoapods-art
- The plugin uses authentication as specified in a standard .netrc file.
Swift1machine artifacts.ips.idemia.com2login ##USERNAME##3password ##PASSWORD##
- Once set, add our repo to your CocoaPod's dependency management system:
Bash1pod repo-art add smartsdk "https://artifacts.ips.idemia.com/artifactory/api/pods/smartsdk-ios-local"
- At the top of your project
Podfileadd:
Ruby1plugin 'cocoapods-art', :sources => [2 'master', # so it could resolve dependencies from master repo (the main one), for newer CocoaPods (1.10+) versions it may not be needed anymore3 'smartsdk' # so it could resolve BiometricSDK depdendency4]
- Add the Capture SDK in your
Podfilein one of its pod's version:
Ruby1pod 'BiometricSDK' # Full version of the SDK, contains biometrics & documents features2pod 'BiometricSDK-biometry' # Contains only biometrics (finger+face) features34pod 'BiometricSDK-finger' # Contains only finger features56pod 'BiometricSDK-face' # Contains only face features without internal liveness checking mechanism7pod 'BiometricSDK-document' # Contains only document features8pod 'BiometricSDK-face_document' # Contains only face features without internal liveness checking mechanism & documents features
Above configuration installs iOS frameworks. For XCFramework, 'XCFramework' subspec can be used for face, face_document and document variants. Eg.
Ruby1pod 'BiometricSDK-face_document/XCFramework'
- Then you can use
install:
Bash1pod install
Note: If you are already using our repo, and you cannot resolve some dependency, try to update the specs:
Bash1pod repo-art update smartsdk
Manually
- Download the artifact manually from the artifactory:
SDK variant | SDK link |
|---|---|
| Face+Document+Fingerprint | BiometricSDK-biometry_document.tar.gz |
| Face+Fingerprint | BiometricSDK-biometry.tar.gz |
| Document | BiometricSDK-document.tar.gz |
| Face | BiometricSDK-face.tar.gz |
| Document+Face | BiometricSDK-face_document.tar.gz |
| Fingerprint | BiometricSDK-finger.tar.gz |
| Algorithms | BiometricSDK-algorithms.tar.gz |
| Plugins | BiometricSDK-plugins.tar.gz |
-
In the project editor, select the target to which you want to add a library or framework.
-
Click Build Phases at the top of the project editor.
-
Open the Embedded Binaries.
-
Click the Add button (+).
-
Click the Add Other button below the list.
-
Add the following items:
BiometricSDK.framework- (optionally for face capture)
BiometricSDKFaceCapturePluginNormal.framework(or other face capturing plugin) - (optionally for face capture)
BiometricSDKAlgorithmPlugin_F6_5_LOW70.framework(or other matching algorithm plugin) - (optionally for finger capture new API)
FingerCaptureSDK.framework - (optionally for finger capture new API)
BiometricSDKUIFinger.framework
Note: XCFrameworks are supported with face, face_document and document variants. XCFrameworks are not yet supported with biometry, biometry_document, fingerprint variants.
Plugins
Introduction
Capture SDK comes in few different variants which provide different types of components and functionality as it was described in Getting Started page of this guide. In addition to different variants plugins have been introduced to give even more flexibility than variants of SDK. Every integrator might have different needs and size requirements, which is why we introduce a new plugin mechanism. Plugins are split to two groups: feature and algorithm.
Feature Plugins
Provides various SDK functionalities like: face capture, document capture, etc.
Algorithm Plugins
Algorithm plugins provide extracting biometric data from images, matching these data and store it as templates.
How it Works
To use a particular plugin, it only needs to be embedded within the application. If a configuration is not valid, an error will be raised in the runtime. In the Recommended Configurations section the most common use cases are described.
When the cocoapods are being used for configuration, every pod has its own default configuration, so it doesn't need to have all elements configured.
For example pod 'BiometricSDK-face' is equivalent to setting:
Ruby1pod 'BiometricSDK-face/Framework' # the SDK framework2pod 'BiometricSDK-face/Plugins/FaceCaptureNormal' # face capturing plugin3pod 'BiometricSDK-face/Algorithms/F6_5_LOW70' # algorithm plugin
XCFramework version:
Ruby1pod 'BiometricSDK-face/XCFramework' # the SDK framework2pod 'BiometricSDK-face/Plugins/FaceCaptureNormal-XCFramework' # face capturing plugin3pod 'BiometricSDK-face/Algorithms/F6_5_LOW70-XCFramework' # algorithm plugin
But when there's a need to use different plugins, it needs to have all the elements configured in the Podfile.
Face Capturing Plugins
Face capturing plugins provide various SDK face capturing methods.
FaceCapturePluginLite
It's a plugin meant to be used to work along with an external server for the liveness check. The SDK won't be able to determine if a person in front of a camera is alive or not. It only runs a scanning process. As a result of the scanning, the scanning metadata will be provided. This metadata should be sent to the server to determine the liveness. Because the scanning process won't do any internal face matching, the plugin doesn't require any algorithm plugin. The plugin can be added manually or by using cocoapods by specifying it in the Podfile:
Ruby1pod 'BiometricSDK-face/Framework' # the SDK framework2pod 'BiometricSDK-face/Plugins/FaceCaptureLite' # face capturing plugin3# No need to add algorithm plugin, but BIOMatcherHandler won't work in such case
XCFramework version:
Ruby1pod 'BiometricSDK-face/XCFramework' # the SDK framework2pod 'BiometricSDK-face/Plugins/FaceCaptureLite-XCFramework' # face capturing plugin3# No need to add algorithm plugin, but BIOMatcherHandler won't work in such case
FaceCapturePluginNormal
It's a default plugin, which has been used in the SDK since the beginning, but internally. It's meant to be used for a face scanning with the offline liveness check. To determine liveness it uses an internal face matching algorithms. This is why it requires one of the face algorithm plugins to work. The plugin can be added manually or by using CocoaPods by specifying it in the Podfile:
Ruby1pod 'BiometricSDK-face/Framework' # the SDK framework2pod 'BiometricSDK-face/Plugins/FaceCaptureNormal' # face capturing plugin3pod 'BiometricSDK-face/Algorithms/F6_5_LOW70' # it needs some algorithm to work
XCFramework version:
Ruby1pod 'BiometricSDK-face/XCFramework' # the SDK framework2pod 'BiometricSDK-face/Plugins/FaceCaptureNormal-XCFramework' # face capturing plugin3pod 'BiometricSDK-face/Algorithms/F6_5_LOW70-XCFramework' # it needs some algorithm to work
FaceCapturePluginCr2dMatching
This plugin extends FaceCapturePluginNormal by introducing additional face checks during the offline liveness check for the liveness Active scanning mode. The additional checks makes sure that the same person is doing the liveness check for the whole process. It requires more CPU power to work. Moreover, to determine liveness it uses an internal face matching algorithms. This is why it requires one of the face algorithm plugins to work. The plugin can be added manually or by using CocoaPods by specifying it in the Podfile:
Ruby1pod 'BiometricSDK-face/Framework' # the SDK framework2pod 'BiometricSDK-face/Plugins/FaceCaptureCr2dMatching' # face capturing plugin3pod 'BiometricSDK-face/Algorithms/F6_5_LOW70' # it needs some algorithm to work
XCFramework version:
Ruby1pod 'BiometricSDK-face/XCFramework' # the SDK framework2pod 'BiometricSDK-face/Plugins/FaceCaptureCr2dMatching-XCFramework' # face capturing plugin3pod 'BiometricSDK-face/Algorithms/F6_5_LOW70-XCFramework' # it needs some algorithm to work
Face Matching Algorithm Plugins
These algorithms are used for the face matching. The matching can take place during the face scanning internally or during either the authentication or the identification processes.
Warning: The algorithms are NOT compatible with each other. The templates generated by one of the algorithms cannot be processed with the other one, i.e., it's not possible to match a template generated with F5_0_VID81 against a template generated with F5_4_LOW75. F5_0_VID81 has been used before SDK 4.22.0 as a built-in algorithm. So if an integrator upgrades the SDK's version from a version earlier then SDK 4.22.0, they should continue using F5_0_VID81. If an integrator wants to change the algorithm in their solution, all the stored templates will need to be recreated with the new algorithm.
F6_5_LOW70
This is recommended algorithm plugin for selfie versus selfie matching.
It's very accurate algorithm for face matching. Templates are not compressed with this algorithm. Weighs ~7.8 MB (uncompressed 8.1 MB). It is not compatible with matching selfie versus portrait scanned from an ID document.
Ruby1pod 'BiometricSDK-face/Algorithms/F6_5_LOW70'
XCFramework version:
Ruby1pod 'BiometricSDK-face/Algorithms/F6_5_LOW70-XCFramework'
F5_0_VID81
It's a small face matching algorithm. It can be used when the matching accuracy is not a priority, but size, or when it's being used only for face capturing. Weighs ~4.1 MB (uncompressed 4.4 MB).
Ruby1pod 'BiometricSDK-face/Algorithms/F5_0_VID81'
XCFramework version:
Ruby1pod 'BiometricSDK-face/Algorithms/F5_0_VID81-XCFramework'
F6_0_IDD80
It's a small face matching algorithm. It can be used when the matching accuracy is not a priority, but size, or when it's being used only for face capturing. Weighs ~3.0 MB (uncompressed 3.7 MB).
Ruby1pod 'BiometricSDK-face/Algorithms/F6_0_IDD80'
XCFramework version:
Ruby1pod 'BiometricSDK-face/Algorithms/F6_0_IDD80-XCFramework'
F5_4_LOW75
It's a more accurate algorithm for the face matching than F6_0_IDD80 and F5_0_VID81. It compresses templates to a 116B block, so it can be encoded even into a QRCode, so it can be shared between phones. It's better for matching between a face photo from a document and from a face scanning. Weighs ~12.8 MB (uncompressed 15.5 MB).
Ruby1pod 'BiometricSDK-face/Algorithms/F5_4_LOW75'
XCFramework version:
Ruby1pod 'BiometricSDK-face/Algorithms/F5_4_LOW75-XCFramework'
Recommended Configurations
- The liveness check and the face matching on an external server:
Ruby1pod 'BiometricSDK-face/Framework' # the SDK Core2pod 'BiometricSDK-face/Plugins/FaceCaptureLite'
XCFramework version:
Ruby1pod 'BiometricSDK-face/XCFramework' # the SDK Core2pod 'BiometricSDK-face/Plugins/FaceCaptureLite-XCFramework'
- The liveness check on a device and the face matching on an external server:
Ruby1pod 'BiometricSDK-face/Framework' # the SDK Core2pod 'BiometricSDK-face/Plugins/FaceCaptureNormal'3pod 'BiometricSDK-face/Algorithms/F6_5_LOW70' # any algorithm plugin
XCFramework version:
Ruby1pod 'BiometricSDK-face/XCFramework' # the SDK Core2pod 'BiometricSDK-face/Plugins/FaceCaptureNormal-XCFramework'3pod 'BiometricSDK-face/Algorithms/F6_5_LOW70-XCFramework' # any algorithm plugin
- The liveness check and the face matching on a device:
Ruby1pod 'BiometricSDK-face/Framework' # the SDK Core2pod 'BiometricSDK-face/Plugins/FaceCaptureNormal'3pod 'BiometricSDK-face/Algorithms/F6_5_LOW70'
XCFramework version:
Ruby1pod 'BiometricSDK-face/XCFramework' # the SDK Core2pod 'BiometricSDK-face/Plugins/FaceCaptureNormal-XCFramework'3pod 'BiometricSDK-face/Algorithms/F6_5_LOW70-XCFramework' # any algorithm plugin
SDK Size
SDK variant | SDK size |
|---|---|
| Face+Document+Fingerprint (offline liveness + matching) | 47.35 MB |
| Face+Document+Fingerprint (offline liveness) | 39.12 MB |
| Face+Document+Fingerprint (backend) | 33.32 MB |
| Face+Fingerprint (offline liveness + matching) | 31.61 MB |
| Face+Fingerprint (offline liveness) | 23.38 MB |
| Face+Fingerprint (backend) | 17.58 MB |
| Face (offline liveness + matching) | 28.79 MB |
| Face (offline liveness) | 20.56 MB |
| Document | 20.20 MB |
| Face (backend) | 14.76 MB |
| Document+Face (offline liveness + matching) | 44.53 MB |
| Document+Face (offline liveness) | 36.30 MB |
| Document+Face (backend) | 30.50 MB |
| Fingerprint | 06.98 MB |
All sizes are estimated download sizes from App Store on arm64 devices. Note that universal IPA file size containing the SDK might be visibly different in case it's built also for other architectures and/or includes bitcode.
Sizes are total sizes for the whole packages which includes:
- an appropriate SDK variant
- capture plugins
- algorithms plugins
- UIExtension library
- UIExtension's additional resources like tutorials and animations
Different packages variants contains:
- offline liveness + matching: an appropriate SDK, Face Normal plugin, F5_4_LOW75 algorithm, UIExtensions, face capturing tutorials
- offline liveness: SDK, Face Normal plugin, F6_0_IDD80 algorithm, UI
- backend: SDK, Face Lite plugin, no algorithm, UI
License Manager
Remember: A valid license is required before using any feature of the SDK.
To have a valid license:
- Obtain an instance of
LicenseManagerviaprovideLicenseManager()method. - Call
activate()method on it.
Before Starting
Note: If you use the debug LKMS server without a SSL connection, you should add permission for the arbitrary loads in the transport security section in your Info.plist file. But it's highly recommended NOT to set this permission without the reason.
XML1<key>NSAppTransportSecurity</key>2 <dict>3 <key>NSAllowsArbitraryLoads</key>4 <true/>5 </dict>
New license manager
The License manager is the main entry point to use the SDK. You can manage licenses through LicenseManager.
Note: A valid license is required before using any feature of the SDK.
provideLicenseManager
This static method provides an instance of LicenseManager with a predefined LKMS profile. Any interaction with LicenseManager must be executed before starting capture.
Swift1let manager = LicenseManager.provideLicenseManager(profileId: LkmsProfileId, apiKey: LkmsApiKey, serverUrl: lkmsUrl)
Activating license
This method fetches the license if it's not locally stored and activates it. Additionally, in cases where the license has expired, the function retrieves a new license. This process is crucial and must occur each time the application starts.
Callback solution:
Swift1manager.activate { (error: LicenseActivationError) in2 if let error {3 // Failed to fetch or activate the license.4 } else {5 // License fetched and activated with success.6 }7 }
Async solution:
Swift1let result: Result<Void, LicenseActivationError> = await manager.activate()2 switch result {3 case .success:4 // License fetched and activated with success.5 case .failure(let error):6 // Failed to fetch or activate the license.7 }
LicenseActivationError
This is the information about why the license can not be activated.
Attribute | Description |
|---|---|
| type ActivationErrorType | The type of error that occurred during the license activation. |
| message String | The reason for the activation failure. |
ActivationErrorType
Attribute | Description |
|---|---|
profileExpired | The profile has expired, all licenses won’t work anymore. (Contact with support) |
activationCountExceeded | No more licenses can be consumed. (Contact with support) |
authenticationIssue | The credentials and/or profile are wrong. |
connectionIssue | Connection issue. (Check internet connection and server url) |
licenseSignatureVerificationFailed | Verification of the license signature is failed. Mostly this error is thrown when integrator switch between development and App Store builds. |
unknown | Unknown issue. |
New face capture API - (recommended)
Introduction
In order to make integration of the SDK easier and more intuitive - new API for Face Capture has been delivered. It is based on use cases that are self-explaining which provide specific information depending on a given use case. This allows integrator to focus on working with the data provided by the SDK rather than on SDK configuration.
NOTE: As for now, the new API supports only remote use case.
Integration steps
For successful integration 4 steps are needed.
-
License activation and camera permission. In order to use SDK proper license has to be activated. License Manager section shows how to handle license and permissions.
-
Integration with services New face capture is currently considered to be a remote-only use case. In order to initiate the capture process, integration with proofing services is required. These proofing services are responsible for performing liveness detection, ensuring that the captured face image corresponds to a genuine person. Please look at the next paragraphs [Create Session] (#fc-create-session)
-
Use case creation. In order to start capture, it is essential to create a specific use case instance. Each use case have sessionInfo property that contains session configuration and set of delegate that will be used to handle callback methods. Use cases and delegates are described in more detail in the next paragraphs - Face Remote Use Case, Delegates.
To use IDEMIA UI, an optional parameter UISettings can be additionally created. More on that parameter here. Not providing UISettings will just present capture preview, without any additional UI.
Once these three steps are satisfied, theFaceCaptureView can be set up passing use case instance and optionally UI settings as parameters. After setting up a captureView, capture can be started by calling start() method. Delegate attached to the use case will receive data from the capture.
Swift1let environmentInfo = // select type of authorization2 let delegates = // create delegates3 let useCase = //create use case4 let uiSettings = // optionally create ui settings, could be nil5 self.captureView.setup(with: useCase, uiSettings: uiSettings)6 self.captureView.start()
- Add
FaceCaptureViewto the layout. It inherits from UIView and has to be used as a preview on the capture's UI.FaceCaptureViewis also used to start face capture and cancel it if needed. So this is not only a capture preview but also entry point to the SDK.
Swift1FaceCaptureView2 func setup(useCase: FaceCaptureUseCase, uiSettings: UISettings?)3 func start()4 func cancel()
Adding FaceCaptureView to the view controller.
Storyboard
In project that uses storyboards FaceCaptureView should be added as an IBOutlet to a layout of the view used for face capture.
Swift1@IBOutlet private weak var captureView: FaceCaptureView!
More programmatically
If you want to use FaceCaptureView programmatically just follow
Add property to your view controller class.
Swift1private weak var captureView: FaceCaptureView?
Next is displaying FaceCaptureView:
Swift1let captureView = FaceCaptureView()2 captureView.translatesAutoresizingMaskIntoConstraints = false3 captureView.contentMode = .scaleToFill4 view.addSubview(captureView)5 NSLayoutConstraint.activate([6 captureView.topAnchor.constraint(equalTo: view.safeAreaLayoutGuide.topAnchor),7 captureView.trailingAnchor.constraint(equalTo: view.safeAreaLayoutGuide.trailingAnchor),8 captureView.bottomAnchor.constraint(equalTo: view.safeAreaLayoutGuide.bottomAnchor),9 captureView.leadingAnchor.constraint(equalTo: view.safeAreaLayoutGuide.leadingAnchor)10 ])11 self.captureView = captureView
Type of authorization
New Face Capture is compatible with two types of the authorization. It is API key and OAuth.
OAuth
In token type authorization, an access token is generated by the authorization server using the provided secrets. This token can be utilized by creating an AccessToken class and using the appropriate initializer in the EnvironmentInfo class: init(accessToken: AccessToken, baseUrl: URL).
Getting started with OAuth
If you want to read more about OAuth you can check this website.
AccessToken
The AccessToken class holds information about the secret and token type from the OAuth authorization server.
Where can secrets be found for token generation?
Secrets can be found on the webpage: https://experience.idemia.com/dashboard/my-identity-proofing/access/environments/. There is possiblity to generate it manually on the page or make a request to the authorization server.
An example successful response from the authorization server:
JSON1HTTP/1.1 200 OK2Content-Type: application/json;charset=UTF-83Cache-Control: no-store4Pragma: no-cache56 {7 "access_token":"2YotnFZFEjr1zCsicMWpAA",8 "token_type":"example",9 "expires_in":3600,10 }
AccessToken class description
Parameter | Description |
|---|---|
| secret String | This is the access_token parameter mapped from the authorization server response. |
| tokenType String | Token type indicates how it should be used in the authorization request. This is the token_type parameter mapped from the authorization server response. |
API key
The API key is generated once and is passed to the apikey parameter in
EnvironmentInfo initializer: init(apiKey: String, baseUrl: URL)
Creating Session
Session creation should be implemented on the backend side. As a result of session creation a sessionId is being returned. To create session following API calls have to be performed.
To proceed with ID&V platform/GIPS, follow these steps:
-
Create identity by calling POST request:
/gips/v1/identitiesAs a result an identity is being returned -
Submit confirmation that the user has consented to perform specific evidence verifications POST request:
/gips/v1/identities/{id}/consents -
Start liveness session by calling POST request
/gips/v1/identities/{id}/attributes/portrait/live-capture-session?mode=nativeSDKSession Id is being returned as a result.
If you want more detailed instructions about creating session please refer to ID&V API documentation, steps 1 to 3: Liveness video capture using a native SDK
To proceed with WebBio, follow these steps:
- To create a session, make a POST request to the endpoint
/bioserver-app/v2/bio-sessionsand include the session data in the request body. - Optionally, retrieve the session path from the response.
- Retrieve the bioSession ID by making a GET request to
/bioserver-app{bioSessionPath}. The response to this call will contain the session ID used by the SDK. - Initialize the session by sending a POST request to
/bioserver-app/v2/bio-sessions/{bioSessionId}/init-liveness-parameters, providing the session ID from the previous step and the liveness parameters in the request body.
For more detailed instructions on creating a session with WebBio, refer to the "Replay challenge" section in the IDEMIA Biometric Services Documentation. You can find the described API requests on the biometric-services API Explorer page.
Use Cases
Capture settings of New Face Capture API are done by using proper, predefined configuration, designed for specific use case. In this way capture configuration is more intuitive and less confusing.
- feedbackDelegate - delegate receives feedback message that can be mapped to instructions presented to user,
- trackingDelegate - receives face tracking data that can be used to draw box around tracked elements,
- livenessActiveDelegate - if active liveness challenge is chosen this delegate receives pointer and targets status update.
More information about delegates is covered in here
FaceRemoteCaptureUseCase
This use case performs face capture with backend communication. In order to provide correct flow, sessionId, environmentInfo and RemoteCaptureDelegates must be provided during RemoteUseCase initialization. sessionId of face capture session on IDEMIA Identity and Verification service for SDK is require to start communication with the backend. More about creating session to be found here. Parameter environmentInfo contains type of authorization like apikey or OAuth token. Moreover it has address to the environment. After communication is established and challenge is started RemoteCaptureDelegates provide status and feedback information of the face capture.
RemoteCaptureUseCase field | Description |
|---|---|
| sessionId String | Live capture session id |
| environmentInfo EnvironmentInfo | Object that contains both: url to face liveness server and secrets needed for authorization. It can be apikey or OAuth access token |
| delegates RemoteCaptureDelegates | Delegates used to handle face capture callbacks. |
Swift1let useCase = FaceRemoteCaptureUseCase(sessionId: sessionId, delegates: delegates, environmentInfo: environmentInfo)2self.captureView.setup(with: useCase, uiSettings: uiSettings)3self.captureView.start()
PassiveLivenessUseCase
PassiveLivenessUseCase is a use case that performs capture offline by directing camera into a face. To set up the use case, assign delegates you need and pass the object to FaceCaptureView.setup method. The use case has additional, optional configuration options you can modify. See API Reference to learn more.
Swift1let delegates = PassiveCaptureDelegates(2 trackingInfoDelegate: delegate,3 captureFeedbackDelegate: delegate,4 resultDelegate: delegate5 )6 let useCase = PassiveLivenessUseCase(delegates: delegates)7 self.captureView.setup(with: useCase, uiSettings: uiSettings)8 self.captureView.start()
ActiveLivenessUseCase
ActiveLivenessUseCase is a use case that performs capture offline by requesting actions from user. To set up the use case, assign delegates you need and pass the object to FaceCaptureView.setup method. The use case has additional, optional configuration options you can modify. See API Reference to learn more.
Swift1let delegates = ActiveCaptureDelegates(2 livenessActiveDelegate: delegate,3 trackingInfoDelegate: delegate,4 captureFeedbackDelegate: delegate,5 resultDelegate: delegate6 )7 let useCase = ActiveLivenessUseCase(numberOfPoints: 3, delegates: delegates)8 self.captureView.setup(with: useCase, uiSettings: uiSettings)9 self.captureView.start()
UISettings
Optional parameter that can contain configuration of UI elements colors, sizes etc. used in face capture challenges displayed on FaceCaptureView. It allows individual customization for all of 4 types of liveness challenges:
UISettings field | Description |
|---|---|
| passiveVideoCaptureSettings PassiveVideoCaptureSettings | Custom UI settings for passive video capture challenge. |
| passiveCaptureSettings PassiveCaptureSettings | Custom UI settings for passive liveness challenge. |
| livenessActiveCaptureSettings LivenessActiveCaptureSettings | Custom UI settings for active liveness challenge. |
| mlcCaptureSettings MLCCaptureSettings | Custom UI settings for MLC. |
Swift1class UISettings {2 var passiveVideoCaptureSettings: PassiveVideoCaptureSettings?3 var passiveCaptureSettings: PassiveCaptureSettings?4 var livenessActiveCaptureSettings: LivenessActiveCaptureSettings?5 var mlcCaptureSettings: MLCCaptureSettings?6}
Delegates
This section describes delegates available for specific use cases within new API for face capture. Please remember that all UI operations should be performed on main thread.
Capture Delegates
Delegates are used as a mechanism to return information about capture process and status. To receive such information simply set an instance of your class as a delegate and implement methods from the protocol. Delegates are dedicated for specific use cases. However, all use cases have common 3 general delegates, which are as follows:
Face feedback delegate
It is mandatory to instruct user to properly place device during capture and also provides instruction to pass the liveness challenge.
Swift1func captureInfoReceived(feedback: FaceCaptureFeedback)
Method called after feedback info is available. Returns FaceCaptureFeedback which is an enum with 11 possible messages. Those feedback messages can be mapped and displayed to the user on the UI. For example, faceInfoCenterMoveForwards can be mapped to "Please move your face forward". More examples can be found in FaceSampleApp.
Face tracking delegate
Returns coordinates of users face position on screen.
Swift1captureInfoReceived(trackingData: FaceTrackingInfo)
Delegate returns FaceTrackingInfo that has coordinates and dimensions of a frame that can be drawn around user's face.
Liveness Active Delegate
Delegate used for Join-the-points challenge.
Swift1func pointerUpdated(pointerInfo: PointerInfo)2 func targetUpdated(targetInfo: TargetInfo)3 func targetsNumberReceived(numberOfTargets: Int)
Provides information about states and positions of various UI elements used during Active Liveness (Join The Points) challenge. It updates about current pointer position on screen, target coordinates and state and number of targets.
Remote Capture Delegates
Step Info Delegate
Delegate method that returns information about current capture step which reflects the status of face capture process.
Swift1func captureInfoReceived(stepInfo: StepInfo)
Step info can have one of two values:
- after capture is started -
captureStartedstep info is being returned. At this point any UI progress indicator should be hidden andFaceCaptureViewhas to be displayed to the user. - when
preparingLivenessstep is returned in the context of liveness, it indicates that liveness metadata is being sent to the backend. This callback can be utilized to display a UI component that visually represents the ongoing task, such as a system "UIActivityIndicatorView."
Passive Video Delegate
In case of passive video challenge, multiple events take place. This delegate provides information about what is happening and returns data that can be used as a parameter for custom UI components.
Swift1func preparationStarted()2 func preparationFinished()3 func overlayDidUpdate(overlay: OvalOverlay)4 func progressDidUpdate(progress: CGFloat)
First two delegate methods inform about when video passive challenge preparation has been started and when finished. This process takes about few seconds so this information can be used to show a loading indicator or other custom waiting screen.
Overlay updates using overlayDidUpdate are needed to draw a custom overlay on screen. It is in shape of an oval on the center of the screen and the challenge for the user is to align his face inside it. If user's face place inside the overlay, a progress using progressDidUpdate is updated. Progress value has to be displayed as a text or visual hint to the user.
Capture Liveness Delegate
Delegate method that returns information about liveness mode used for current capture
Swift1func captureLiveness(liveness: Liveness)
Liveness parameter contains information about current mode used in capture. It can have one of 4 values" active, passive, passiveVideo, mlc.
Capture Result Delegate
Delegate that has one method, which is being called after remote face capture is finished.
Swift1func captureDidFinish(result: FaceCaptureResult)
It provides FaceCaptureResult parameter which informs if capture has been successful. In case of failed capture, it returns error. No other callback will occur after this method.
Liveness Processing Delegate
Delegate has one method which is called during the preparingLiveness phase of the capture process.
Swift1func livenessMetadataUploadDidUpdate(progress: Double)
It provides information about upload progress of metadata.
This delegate provides information related to Multidimensional Liveness Check face capture.
It contains following methods:
Swift1func captureDidUpdate(smileStability: Double)
Provides the percentage (0.0-1.0) of smile step completion.
Swift1func captureDidUpdate(smileSize: Double)
Provides current smile size (0.0-1.0).
Swift1func captureSmileDidFinish()
Called when smile acquisition process has ended.
Swift1func captureDidUpdate(previewScale: Double)
Indicates that illumination process is ready to start. scale parameter is a percentage value and should be used to rescale preview component before triggering illumination.
Swift1func captureIlluminationDidUpdate(progress: Double)
Provides current illumination progress.
Swift1func captureDidUpdateIllumination(red: Int, green: Int, blue: Int)
Provides colors which should be used as a part of illumination process. Background of preview should change according to those colors.
Swift1func captureIlluminationDidFinish()
Called after end of illumination process.
Swift1func captureWillStartIllumination(requestIllumination: @escaping () -> ())
Provides a closure, which is used to start illumination.
Example integration
Example integration: View controller with remote capture use case set to passive liveness.
Important - There are two types of remote face liveness integration available:
- Integration with the ID&V platform/GIPS is demonstrated in the sample app called FaceSampleAppLite.
- Integration with the WebBio service is showcased in the sample app called FaceSampleAppLiteWBS.
If you want to see examples and observe how the integration works, you can refer to the sample applications.
Swift1import UIKit2import FaceCaptureSDK34// For convinience, used protocol can be grouped5protocol CaptureDelegate: FaceFeedbackDelegate, FaceTrackingDelegate, CaptureResultDelegate, StepInfoDelegate {6}78class FaceCaptureViewController: UIViewController {9 // session id has to be provided by the customer backend10 private var sessionId: String1112 override func viewDidLoad() {13 super.viewDidLoad()1415 if let useCase = // create Remote Use Case providing session info, api key and host url16 let uiSettings = // create UISettings17 self.captureView.setup(with: useCase, uiSettings: uiSettings)18 self.captureView.start()19 }20}2122// Handling delegate callbacks23extension FaceCaptureViewController: CaptureDelegate {24 func captureInfoReceived(feedback: FaceCaptureFeedback) {25 //TODO: Map feedback entry to proper information and display it to the user26 //ie. case faceInfoComeBackField: -> "Move closer"27 }2829 func captureInfoReceived(trackingInfo: FaceTrackingInfo) {30 //TODO. If needed a rectangle box can be drawn on screen using coordinates31 // from tracking info object.32 }3334 func captureDidFinish(result: FaceCaptureResult) {35 // Handle capture finished callback: show success or error screen.36 }3738 func captureInfoReceived(stepInfo: StepInfo) {39 // Handle UI depending on capture state, for example:40 switch stepInfo {41 case .preparingLiveness:42 // Show loading indicator43 case .captureStarted:44 // Hide loading indicator, show preview45 }46 }47}
- creating capture session section for more details.
- Create MLCCaptureSettings object and pass it to UISettings object.
Swift1let mlcCaptureSettings = MLCCaptureSettings()2let uiSettings = UISettings(mlcCaptureSettings: mlcCaptureSettings)
- Create FaceRemoteCaptureUseCase with sessionId, EnvironmentInfo and delegates.
Swift1let sessionId: String // created in step 1.2let delegates = RemoteCaptureDelegates(3 feedbackDelegate: feedbackDelegate,4 captureResultDelegate: resultDelegate5)6let useCase = FaceRemoteCaptureUseCase(sessionId: sessionId, delegates: delegates, environmentInfo: environmentInfo)
- Call
setup()on FaceCaptureView with previously created objects and thenstart():
Swift1self.captureView.setup(with: useCase, uiSettings: uiSettings)2self.captureView.start()
After that capture will be started.
Integration based on MLCDelegate
The second way of handling MLC capture is to implement your own UI and logic for handling each phase of the capture. It's more complex,
but allows better customization than approach with using UISettings. This integration is based on correctly handling information coming from
MLCDelegate. As mentioned before, MLC capture consists of three phases:
- Framing requires correctly placing the face within the preview. To proceed, the user have to follow feedback coming from
CaptureFeedbackListener. - Smile starts after receiving feedback
.makeSmile. There are three methods in MLCDelegate related with this phase:captureDidUpdate(smileStability:)- which can be used to track progress of whole phase,captureDidUpdate(smileSize:)- to show smile progress for the user (It can be done for example using SmileIndicatorBar) andcaptureSmileDidFinish()- which means that smile phase ended. - Illumination - during this phase preview overlay have to change colors according to values coming from the SDK. To properly handle
this phase, you have to:
- Rescale FaceCaptureView with value received from
captureDidUpdate(previewScale:)method. - Show some additional instructions for the user, for example informing about incoming color changes or necessity of moving face closer to the screen due to changed preview size.
- Trigger illumination process by calling the closure provided in
captureWillStartIllumination(requestIllumination:)method. - Adjust color of preview overlay to values coming from
captureDidUpdateIllumination(red: Int, green: Int, blue: Int). If you want to track progress of illumination phase, then progress will be returned incaptureIlluminationDidUpdate(progress:)(as value in range between 0.0 and 1.0). The process ends whencaptureIlluminationDidFinish()is called.
- Rescale FaceCaptureView with value received from
When MLCDelegate is implemented based on given instructions, then you must:
- Create screen with FaceCaptureView which does not cover all available space - because during illumination phase user's face should be
verified with sequence of a color flashes, and FaceCaptureView preview overlay have to be adjusted to colors from
captureDidUpdateIllumination(red: Int, green: Int, blue: Int)callback.
- Create session with Liveness of type MLC. See creating capture session section for more details.
- Create FaceRemoteCaptureUseCase with sessionId, EnvironmentInfo and delegates.
Swift1let sessionId: String // created in step 2.2let delegates = RemoteCaptureDelegates(3 feedbackDelegate: feedbackDelegate,4 captureResultDelegate: resultDelegate,5 mlcDelegates: mlcDelegates6)7let useCase = FaceRemoteCaptureUseCase(sessionId: sessionId, delegates: delegates, environmentInfo: environmentInfo)
- Call
setupon FaceCaptureView with previously created objects and thenstart():
Swift1self.captureView.setup(with: useCase, uiSettings: nil)2self.captureView.start()
MLC: UI components
To configure the UI according to specific requirements, instructions and selected exposed components are provided for seamless integration of MLC mode. The available options include:
- Customization of
MLCCaptureView: Modify and adapt the MLCCaptureView to align with specific design and functionality needs. - Using only
SmileFaceProgressViewIntegrate theSmileSizeProgressViewindependently and visualize smile progression without utilizing the entireMLCCaptureView.
Network Security Configuration
Face Capture SDK allows to setup public key pinning for network communication with backend services. To enable this feature, simply add in your app's Info.plist file object similar to below one:
XML1<?xml version="1.0" encoding="UTF-8"?>2<!DOCTYPE plist PUBLIC "-//Apple//DTD PLIST 1.0//EN" "http://www.apple.com/DTDs/PropertyList-1.0.dtd">3<plist version="1.0">4<dict>5 <key>CaptureSDKNetworkSecurityConfig</key>6 <dict>7 <key>CaptureSDKDomainConfig</key>8 <array>9 <dict>10 <key>CaptureSDKDomain</key>11 <string>proofing.app.eu.identity-prod.idemia.io</string>12 <key>CaptureSDKPinSet</key>13 <array>14 <string>VnaVguILcTfqALKLEhMtqKzXG6KK7w5T1Px7LO+dbVw=</string>15 </array>16 <key>CaptureSDKPinSetExpirationDate</key>17 <date>2024-03-25T10:57:42Z</date>18 </dict>19 </array>20 </dict>21</dict>22</plist>
CaptureSDKDomainConfig array should contain a dictionary for each domain pin set. Expiration date can be set (via CaptureSDKPinSetExpirationDate) to not check for expired certificates. CaptureSDKDomain must be exact domain (without wildcards). The CaptureSDKPinSet can contain multiple SHA-256 key hashes encoded in Base64. Supported public key types: RSA (2048, 3072 and 4096), ECDSA (secp256r1 and secp384r1).
Key pinning is considered enabled for a domain when at least one non-expired non-empty pin set is available for a domain. For each request made in Face Capture SDK, if there is no matching pin (public key hash) to the ones found in SSL challenge certificate public keys, the request will be canceled.
Biometric Capture SDK
Create a FaceCaptureHandler
This retrieves a capture handler to perform the face biometric capture operations. You must first configure the capture options.
-
Please check the use case named Capture face biometrics.
-
Also, you can check all the features provided by this handler here.
Objective-C1@interface ViewController () <FaceCaptureHandlerDelegate>2 @property (strong, nonatomic) id<FaceCaptureHandler> captureHandler;3 @end4 ...5 [BIOSDK createFaceCaptureHandlerWithOptions:[FaceCaptureOptions new] withCompletionHandler:^(id<FaceCaptureHandler> captureHandler, NSError* error) {6 if (!error) {7 self.captureHandler = captureHandler;8 self.captureHandler.delegate = self;9 ...10 }11 }];
Parameter | Description |
|---|---|
| options FaceCaptureOptions* | The capture options to configure the face capture handler. |
| completionHandler void (^)(id | Block of code that will be called after FaceCaptureHandler finishes initialization. It will pass an error if any occurred. |
Note: Errors code list is here
BIOReplayProtocol
This protocol defines the methods that will be available in all capture handlers. However, they should be implemented to reference its sub protocols (eg. FaceCaptureHandlerDelegate) instead of BIOReplayProtocol.
captureFinishedWithError
This method is called whenever a capture finished with an error and cannot be resumed by Biometric Capture SDK.
Objective-C1-(void)captureFinishedWithError:(NSError*)error
Parameter | Description |
|---|---|
| error NSError* | The error that caused the capture to finish. |
replayDidFinishRecording
This method is called whenever a replay finished playing. These replays are used to play the recorded videos of a capture for debugging purposes.
Objective-C1-(void)replayDidFinishRecording
FaceCaptureHandler
This document discusses FaceCaptureHandler.
Start Using FaceCaptureHandler
Note: In order to use FaceCaptureHandler, it's required to load one of the capturing plugins (lite, normal or cr2dMatching).
- Import the framework header to your view controller.
Objective-C1#import <BiometricSDK/BiometricSDK.h>
- Add at least one UIImageView or subclasses to your layout. It will be used to preview the stream from the camera. It is not necessary for the capture to have a preview.
Objective-C1@property (weak, nonatomic) IBOutlet UIImageView *preview;
-
Check your license status here.
-
You also need to have the property for
FaceCaptureHandler. This object is handling all operations related to capturing.
Objective-C1[BIOSDK createFaceCaptureHandlerWithOptions:options withCompletionHandler:^(id<FaceCaptureHandler> captureHandler, NSError* error) {2 self.captureHandler = captureHandler;3 ...4 }];
- Set the delegate for
FaceCaptureHandlertoself.selfwill have to implement theFaceCaptureHandlerDelegateprotocol.
Objective-C1[BIOSDK createFaceCaptureHandlerWithOptions:options withCompletionHandler:^(id<FaceCaptureHandler> captureHandler, NSError* error) {2 self.captureHandler = captureHandler;3 self.captureHandler.delegate = self;4 ...5 }];
- After
FaceCaptureHandlerhas finished its initialization, the preview view can be set.
Objective-C1[BIOSDK createFaceCaptureHandlerWithOptions:options withCompletionHandler:^(id<FaceCaptureHandler> captureHandler, NSError* error) {2 self.captureHandler = captureHandler;3 self.captureHandler.delegate = self;4 self.captureHandler.preview = self.preview;5 ...6 }];
- Now it can start capturing.
Objective-C1[BIOSDK createFaceCaptureHandlerWithOptions:options withCompletionHandler:^(id<FaceCaptureHandler> captureHandler, NSError* error) {2 self.captureHandler = captureHandler;3 self.captureHandler.delegate = self;4 self.captureHandler.preview = self.preview;5 [self.captureHandler startCaptureWithCompletionHandlerError:nil];6 }];
- Whenever the view controller disappears, the resources (e.g. camera) need to be released.
Objective-C1- (void)viewDidDisappear:(BOOL)animated{2 [super viewDidDisappear:animated];3 [self.captureHandler destroy];4 }
FaceCaptureHandler Info
Delegate
This sets the listener to receive the biometrics information.
Objective-C1handler.delegate = ... //Object that implements `FaceCaptureHandlerDelegate` protocol
Preview
This sets the camera preview.
Objective-C1handler.preview = ... //An `UIImageView`
Debug Settings
This sets the camera preview.
Objective-C1BIODebugDataSettings *settings = [[BIODebugDataSettings alloc] init];2 settings.rtvFilePath = ... //A path to RTV video file used for video playback.3 handler.debugSettings = settings;
Note: To stop the camera preview, set preview to nil.
Start Capture
This starts the biometric capture.
Objective-C1[handler startCaptureWithCompletionHandler:^(NSError \* error) {2 ...3 }];
Parameter | Description |
|---|---|
| completionHandler void (^)(NSError*) | An object with an error code if an error occurred, otherwise it will show nil. In addition to error code other data can be returned in error's userInfo structure as described in the table below. |
Additional optional userInfo data:
Parameter | Description |
|---|---|
| lockedUntil | When capture is locked this parameter contains timestamp on which capture will be unlocked. This data is returned only in case of BIOCaptureHandlerErrorCaptureIsLocked. |
Stop Capture
This stops a capture.
Objective-C1[handler stopCaptureWithCompletionHandler:^(NSError \* error) {2 ...3 }];
Parameter | Description |
|---|---|
| completionHandler void (^)(NSError*) | Object with an error code if an error occurred, otherwise it will show nil. |
Switch Camera
This switches between different cameras.
Objective-C1[handler switchCamera:BIOCameraFront withError:&error];2 [handler switchCamera:BIOCameraRear withError:&error];
Parameter | Description |
|---|---|
| camera BIOCamera | Flag that selects the camera. |
| error NSError** | Object with an error code if an error occurred, otherwise it will show nil. |
Overlay
This sets the overlay option.
Objective-C1[self setOverlay:BIOOverlayOFF withError:&error];2 [self setOverlay:BIOOverlayON withError:&error];
Parameter | Description |
|---|---|
| overlay BIOOverlay | Flag that determines if overlay should be on or off. |
| error NSError** | Object with an error code if an error occurred, otherwise it will show nil. |
Orientation
This sets the orientation option.
Objective-C1[self setOrientation:BIOOrientationPortrait withError:&error];2 [self setOrientation:BIOOrientationUpSideDown withError:&error];3 [self setOrientation:BIOOrientationLandscapeLeft withError:&error];4 [self setOrientation:BIOOrientationLandscapeRight withError:&error];
Parameter | Description |
|---|---|
| orientation BIOOrientation | Specifies the orientation of the preview. |
| error NSError** | Object with an error code if an error occurred, otherwise it will show nil. |
Options
This retrieves the capture options used in this handler.
Note: Readonly
Objective-C1FaceCaptureOptions* options = handler.options;
Partial Dump Video
This dumps the last played sequences.
Objective-C1[handler requestPartialDumpVideoWithError:&error];
Note: To dump a partial video, capture with partial dump video recording enabled. This should be done previously.
Parameter | Description |
|---|---|
| error NSError** | Object with an error code if an error occurred, otherwise it will show nil. |
Capture Attempts Left
Returns the number of capture attempts left based on the maxCapturesBeforeDelay provided on the options.
Note: Readonly
Objective-C1NSInteger attemptsLeft = handler.captureAttemptsLeft;
Time to unlock
Returns the number of seconds to unlock the capture or 0 if capture is not locked.
Warning: This value is based on two locking mechanisms. First is described in FaceCaptureOptions (fields: maxCapturesBeforeDelay and timeCaptureDelayArray). For security reasons, there is also a second, internal counter. After significant amount of failures, capture still can be delayed if this feature is not turned off.**
Note: Readonly
Objective-C1NSInteger timeToUnlock = handler.timeToUnlock;
Destroy
This releases all of the handler resources.
Objective-C1[handler destroy];
Use cases
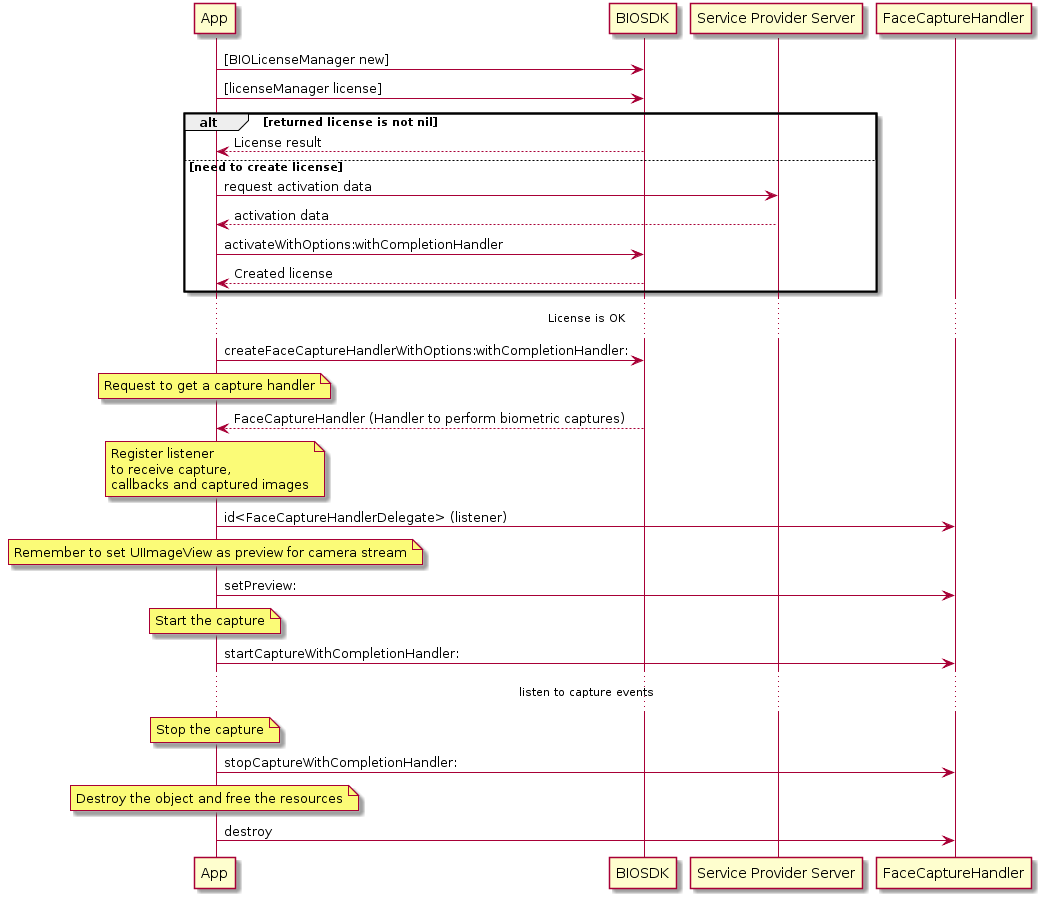
Capture Face Biometrics
Below is displayed the generic execution flow to be followed to perform a biometric capture (Get Picture), and get information about the biometry (Move your head to the left …).
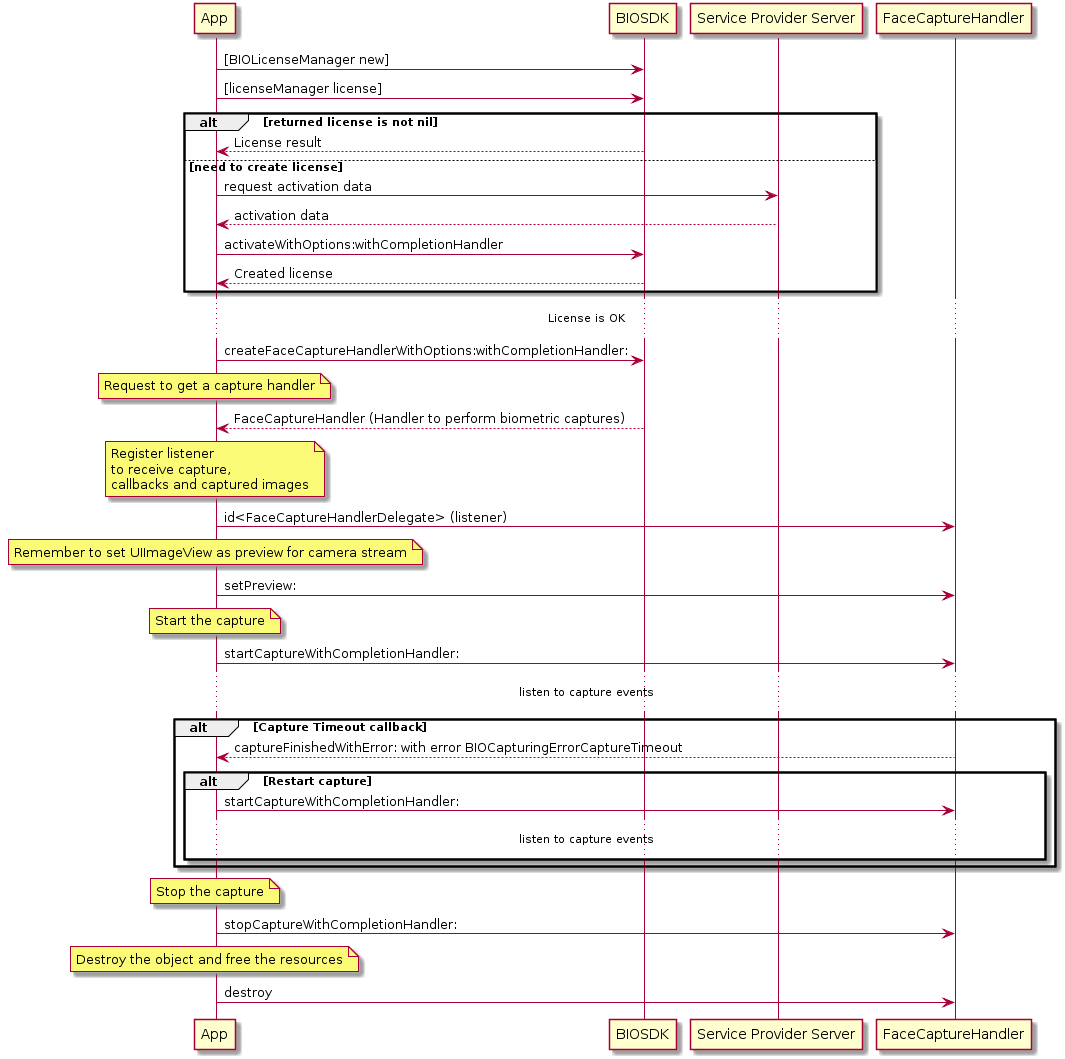
Capture Timeout
Below is displayed the generic execution flow to be followed when a capture timeout happens.
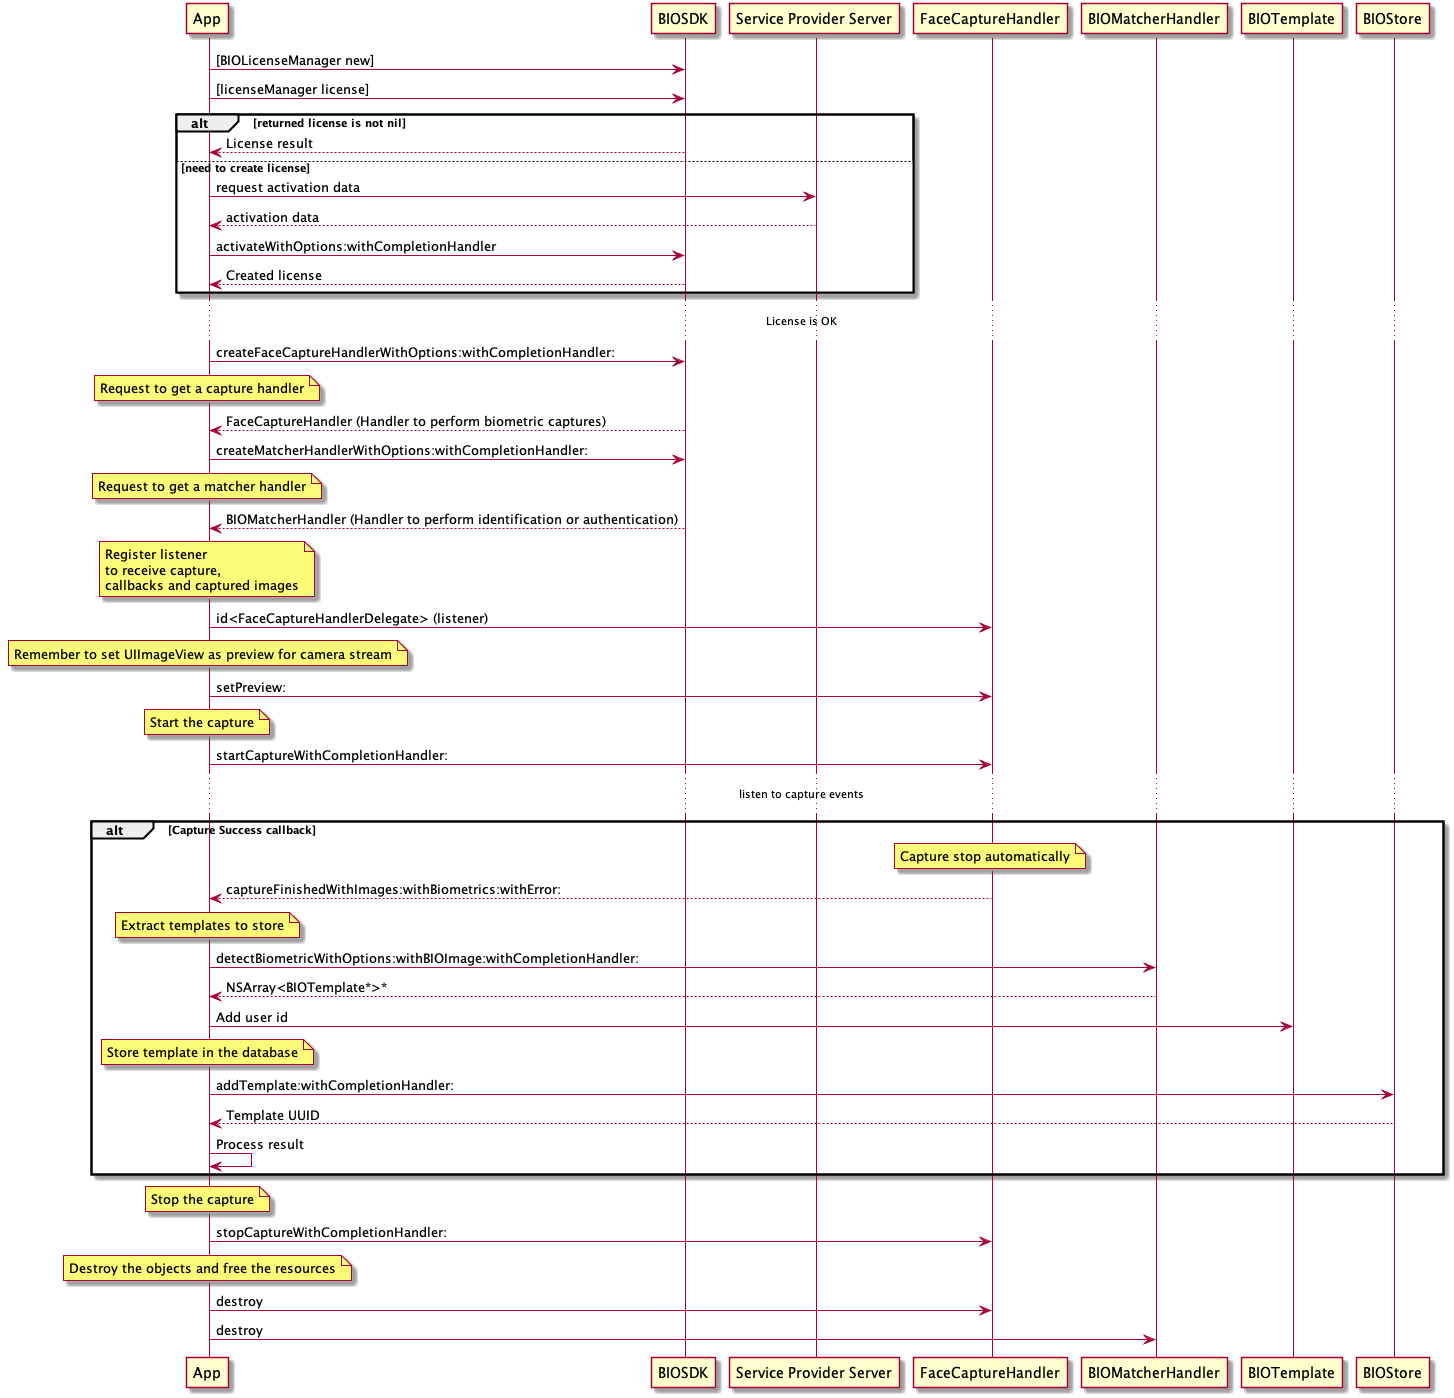
Capture Enroll
Below is displayed the generic execution flow to be followed to perform a biometric capture (Get Picture), and after that, extract the biometric’s template from the image returned by the capture component. Once we have the template we store it in a database and to link it to one user. We add the user ID to the template. As a result of the insertion we are going to receive the UUID of this template in the database.
Compression Recommendations
Compression specification:
- The recommended compression is JPEG90.
- The compression is compliant with backend services.
To compress an image of type BIOFaceImage, it is recommended to use the method from the BIOImage extension: .toJPEG(withQuality:). This ensures proper image compression according to the standards set for backend integration.
Swift1func captureFinished(with images: [BIOFaceImage]?, with biometrics: BIOBiometrics?, withError error: Error?) {2 // Example implementation for compressing BIOFaceImage using JPEG90 quality3 let compressedImage = images?.first?.toJPEG(withQuality: 0.9)4 // Now you can use compressedImage as needed, e.g., uploading it to the backend5 }
BIOMatcherHandler
When the BIOMatcherHandler is meant to be used for one of the SDK's face variants (face, face_document, biometry, biometry_document), it requires one of the face algorithms to be added to the project.
Create a BIOMatcherHandler
This retrieves a handler to perform all the matching, identifying, and template coding operations.
-
Please check the use case named Create BIOMatcherHandler.
-
Also, you can check all the features provided by this handler here.
Objective-C1@interface ViewController () <BIOCaptureHandlerDelegate>2 @property (strong, nonatomic) id<FaceCaptureHandler> captureHandler;3 @end4 .....5 [BIOSDK createMatcherHandlerWithOptions:[BIOMatcherHandlerOptions new]6 withCompletionHandler:^(id<BIOMatcherHandler> matcherHandler, NSError* error) {7 self.matcherHandler = matcherHandler;8 ....9 }];
Parameter | Description |
|---|---|
| options BIOMatcherHandlerOptions* | Object that can configure a session of matcher handler. |
| completionHandler void (^)(id | Block of code that will be called after BIOMatcherHandler finishes initialization. It will pass an error if any occurred. |
Authentication
This verifies a list of candidate templates against a list of reference templates.
Please check the use case named Verify.
Objective-C1BIOAuthenticationOptions* options = [[BIOAuthenticationOptions alloc] initWithModality:BIOModalityFace];2 [self.matcherHandler authenticateWithOptions:options3 withBiometricCandidate:biometricCandidate4 withBiometricReference:biometricReference5 andCompletionHandler:^(BIOAuthenticationResult* result, NSError* error) {6 ...7 }];
Parameter | Description |
|---|---|
| options BIOAuthenticationOptions* | The options used to perform the authentication. |
| biometricCandidate BIOBiometricCandidate* | The biometric candidate with the templates that you want to match. |
| biometricReference BIOBiometricReference* | The biometric reference with a list of templates used as reference. |
| completionHandler void(^)(BIOAuthenticationResult result, NSError error) | Callback to be executed when authentication is finished. |
Identify
This identifies the user to which belongs the list of candidate templates against a list of reference templates. This method can also be used to verify/authenticate users.
Please check the use case named Identify.
Objective-C1BIOIdentificationOptions* options = [[BIOIdentificationOptions alloc] initWithModality:BIOModalityFace];2 [matcher identifyWithOptions:options3 withBiometricCandidate:biometricCandidate4 withBiometricReferences:biometricReferences5 andCompletionHandler:(^(BIOIdentificationResult* result, NSError* error){6 .......7 }];
Parameter | Description |
|---|---|
| options BIOIdentificationOptions* | The options used to perform the identification. |
| biometricCandidate BIOBiometricCandidate* | The biometric candidate with the templates that you want to match. |
| biometricReferences NSArray<BIOBiometricReference*>* | The list of biometric references with a list of templates used as references. |
|completionHandler void(^)(BIOIdentificationResult* result, NSError* error) | Callbacks to be executed when the identification is finished.
Detect Biometric
This detects the biometrics in a BIOImage. This function is intended to be used to extract the all the biometric templates contained in an image (For example all the faces that are in an image).
Please check the use case named Detect Biometric.
Objective-C1BIODetectBiometricOptions* options = [BIODetectBiometricOptions biometricsWithLocation:BIOLocationFaceFrontal2 withModality:BIOModalityFace];3 [matcher detectBiometricWithOptions:options4 withBIOImage:image5 withCompletionHandler:void(^)(NSArray<BIOTemplate*>* templates, NSError* error){6 .....7 }];
Parameter | Description |
|---|---|
| options BIODetectBiometricOptions* | The options used to perform the verification. |
| image BIOImage | The image. |
| completionHandler void(^)(NSArray<BIOTemplate*>* templates, NSError* error) | Callbacks to be executed when the detection is finished. |
Compatibility with New Face API
Async/await
To extract templates for Offline Use Case from the FaceImage, use BIOMatcherHandler methods:
Swift1func detectBiometric(2 with options: BIODetectBiometricOptions,3 faceImage: FaceImage4) async throws -> [BIOTemplate]
Example:
Swift1let faceImage: FaceImage =2 let options = BIODetectBiometricOptions(location: bioImage.biometricLocation, withModality: BIOModalityFace)3 let templates = try await matcherHandler.detectBiometric(with: options, faceImage: faceImage)
Parameter | Description |
|---|---|
| with options BIODetectBiometricOptions | The options used to perform the verification. |
| faceImage FaceImage | The image. |
Completion handler
Swift1func detectBiometric(2 with options: BIODetectBiometricOptions,3 faceImage: BIOImage,4 withCompletionHandler completionHandler: @escaping ([BIOTemplate]?, Error?) -> Void5)
Example:
Swift1var faceTemplates: [BIOTemplate]?2 let options = BIODetectBiometricOptions(location: bioImage.biometricLocation, withModality: BIOModalityFace)3 matcherHandler.detectBiometric(with: options, faceImage: bioImage) { templates, error in4 guard let error else {5 // handling error here6 }7 faceTemplates = templates8 }
Parameter | Description |
|---|---|
| with options BIODetectBiometricOptions | The options used to perform the verification. |
| faceImage FaceImage | The image. |
| completionHandler [BIOTemplate], Error | Completion handler that will return array of founded biometric templates or/and error if any occured. The template type will be BIOFaceTemplate. |
Destroy
This releases all the handler resources.
Objective-C1[matcher destroy];
Helper Objects
BIOMatcherHandlerOptions
This object is used to configure the behavior of MatcherHandler.
Attribute | Description |
|---|---|
| logLevel BIOLogLevel | Level of logs that are displayed during debug. |
BIOMatchingOptions
This is the object that represents a the basic matching options.
Parameter | Description |
|---|---|
| modality BIOModality | The BIOModality option. |
BIOAuthenticationOptions
This is the object that represents a the verification options. This object extends BIOMatchingOptions.
Parameter | Description |
|---|---|
| modality BIOModality | The BIOModality option. |
| threshold int | The authentication threshold to be considered valid (default value: 3500). |
Note: The threshold is the score value that is used to differentiate a HIT from a NOHIT.
FAR | 1% | 0.1% | 0.01% | 0.001% | 0.0001% | 0.00001% |
|---|---|---|---|---|---|---|
| Score | 2500 | 3000 | 3500 | 4000 | 4500 | 5000 |
FAR: proportion of requests that generate a non-expected HIT with two biometric acquisitions of two different persons.
For the use case of a selfie against a selfie within the context of a smartphone, the recommended threshold is 3500.
BIOIdentificationOptions
This is the object that represents a the identification options. This object extends BIOMatchingOptions.
Parameter | Description |
|---|---|
| modality BIOModality | The BIOModality option. |
BIODetectBiometricOptions
This is the object that represents a the verification options. This object extends BIOBiometrics.
Parameter | Description |
|---|---|
| biometricLocation BIOLocation | The BiometricLocation enum option. |
| biometricModality BIOModality | The BiometricModality enum option. |
BIOBiometricReference
This the object that represents a biometric reference to be compared against for authentication and identification proposes.
Parameter | Description |
|---|---|
| templates NSArray<BIOTemplate*>* | The templates to be used. |
| userUUID NSString* | The user uuid to be matched against. |
BIOBiometricCandidate
This is the object that represents a biometric candidate that is used to be authenticated or identified.
Parameter | Description |
|---|---|
| templates NSArray<BIOTemplate*>* | The templates to be used. |
BIOMatchingCandidate
This is the object that represents a candidate result.
Parameter | Description |
|---|---|
| UUID NSString* | The candidate uuid. |
| score long | The identification score result. |
BIOAuthenticationResult
This is the object that represents an authentication result.
Parameter | Description |
|---|---|
| score long | The authentication score result. |
| matchesSuccessfully BOOL | True if the score is bigger than the threshold. |
BIOIdentificationResult
This is the object that represents an identification result.
Parameter | Description |
|---|---|
| candidates NSArray<BIOMatchingCandidate*>* | The authentication score result. |
Use Cases
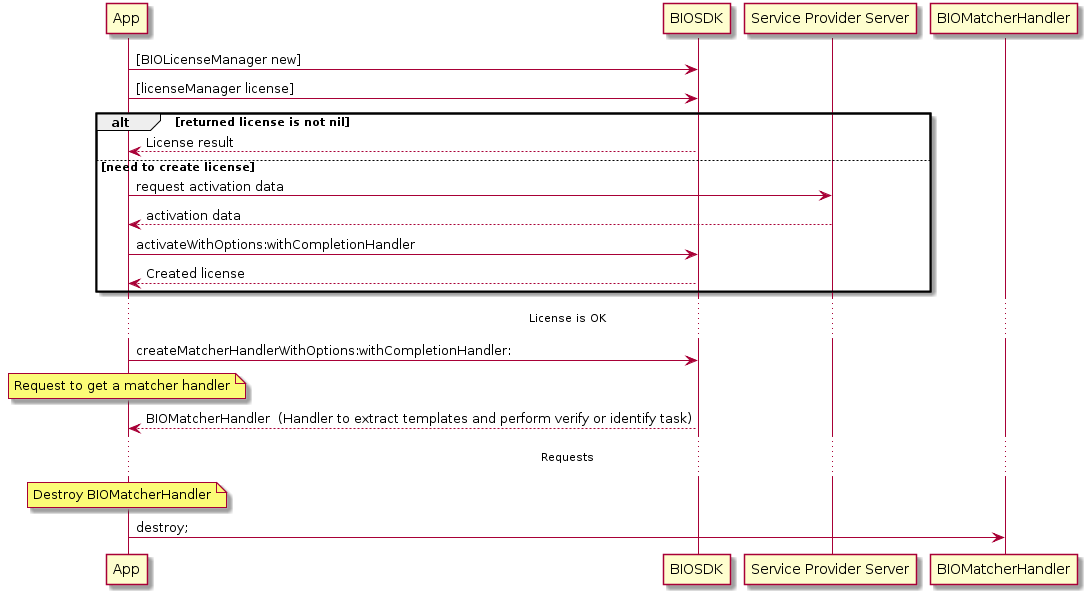
Create BIOMatcherHandler
Below is displayed the generic execution flow to be followed to retrieve and release a BIOMatcherHandler.
Capture Verify
Below is displayed the generic execution flow to be followed to perform a biometric capture (Get Picture), and after that extract the biometric’s template from the image returned by the capture component (This is the candidate template). Once we have the candidate template, we need to retrieve a list of reference templates to match against the candidate and verify that the candidate template belongs to the user. There are two ways to extract a list of template references. One is retrieving them from the database used during the enrolment process. The second one is extracting the templates from another image with detectBiometricWithOptions:withBIOImage:withCompletionHandler:.
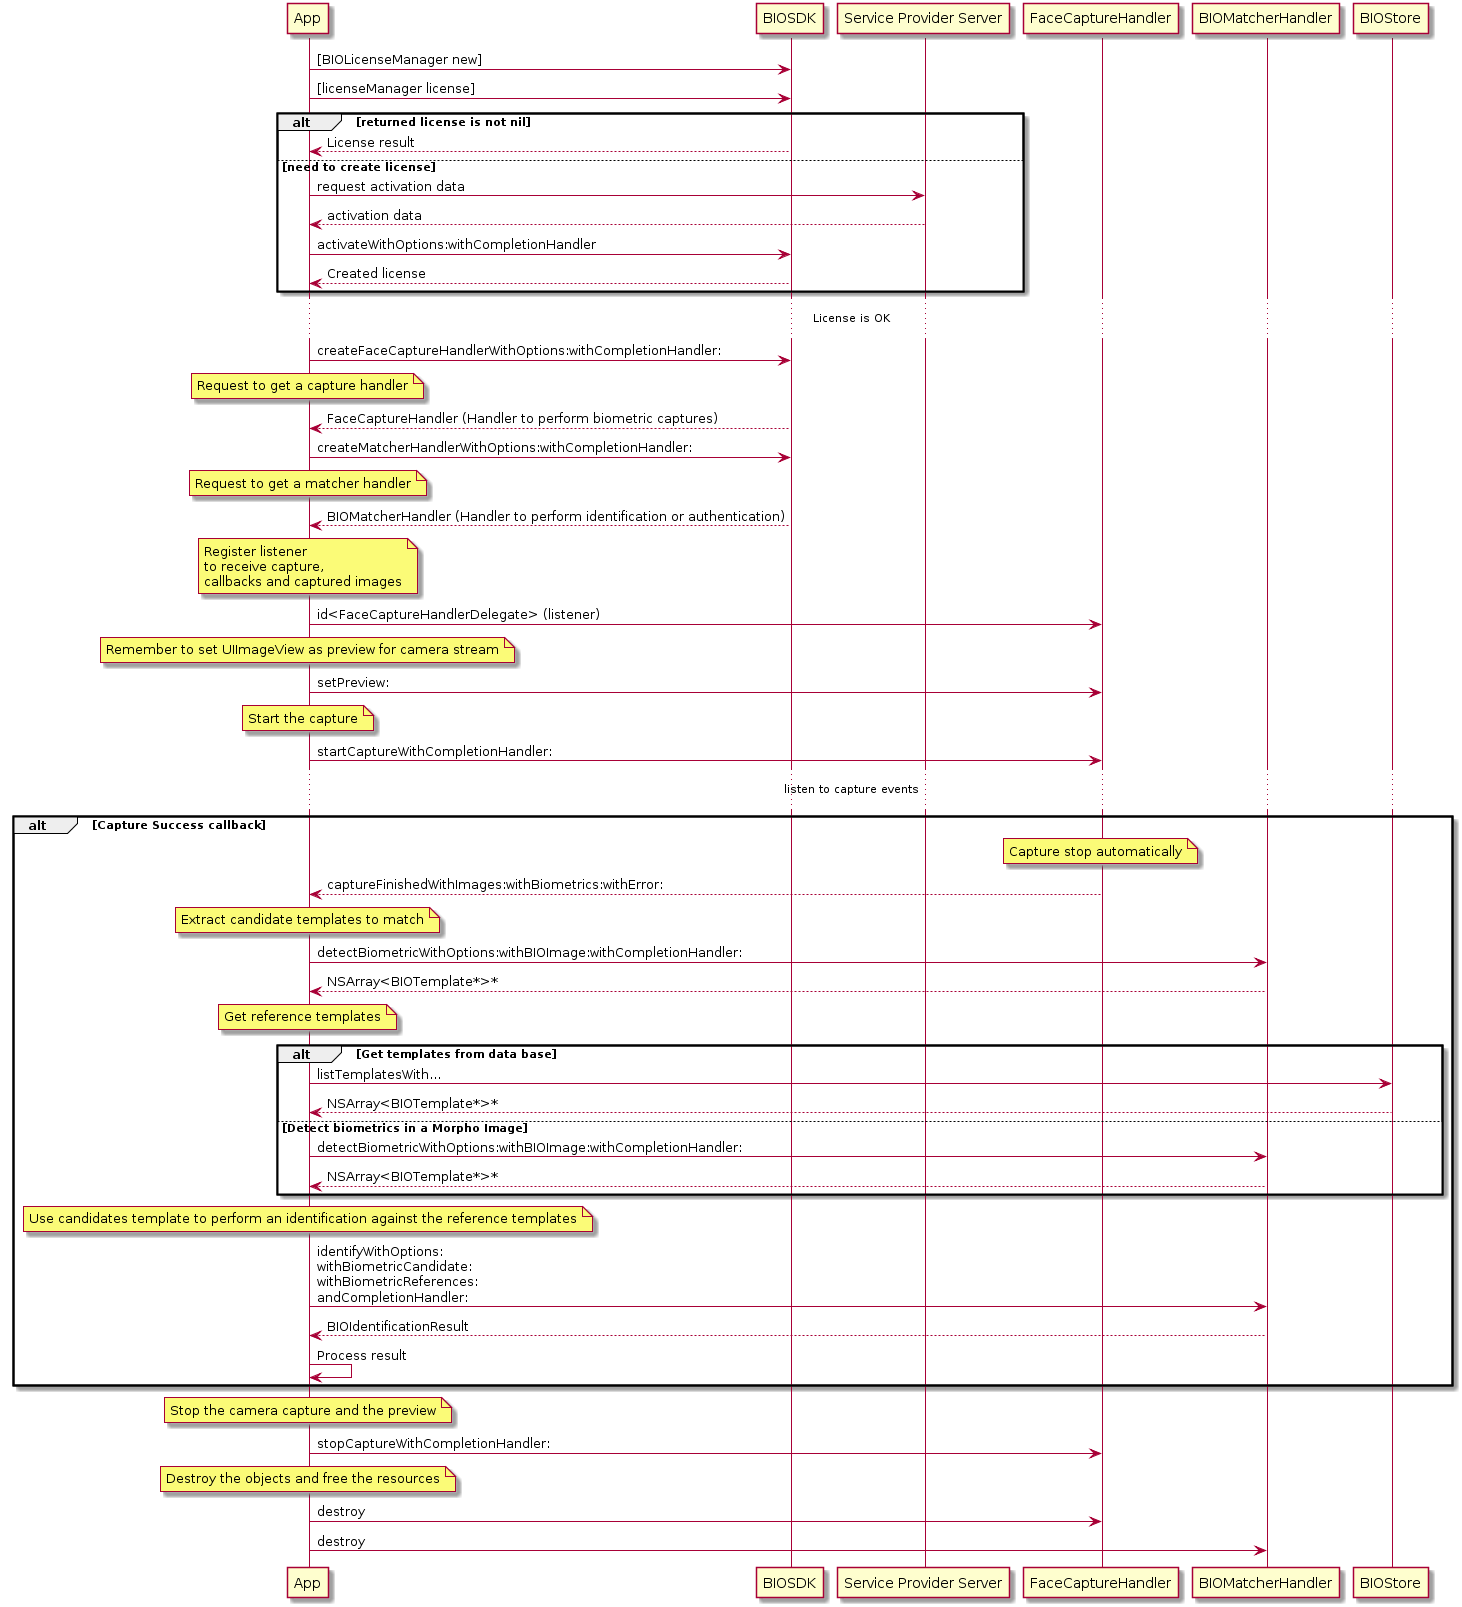
Capture Identify
Below is displayed the generic execution flow to be followed to perform a biometric capture (Get Picture), and after that extract the biometric’s template from the image returned by the capture component (This is the candidate template). Once we have the candidate template, we need to retrieve a list of reference templates to match against the candidate and identify to which user belongs the candidate template.
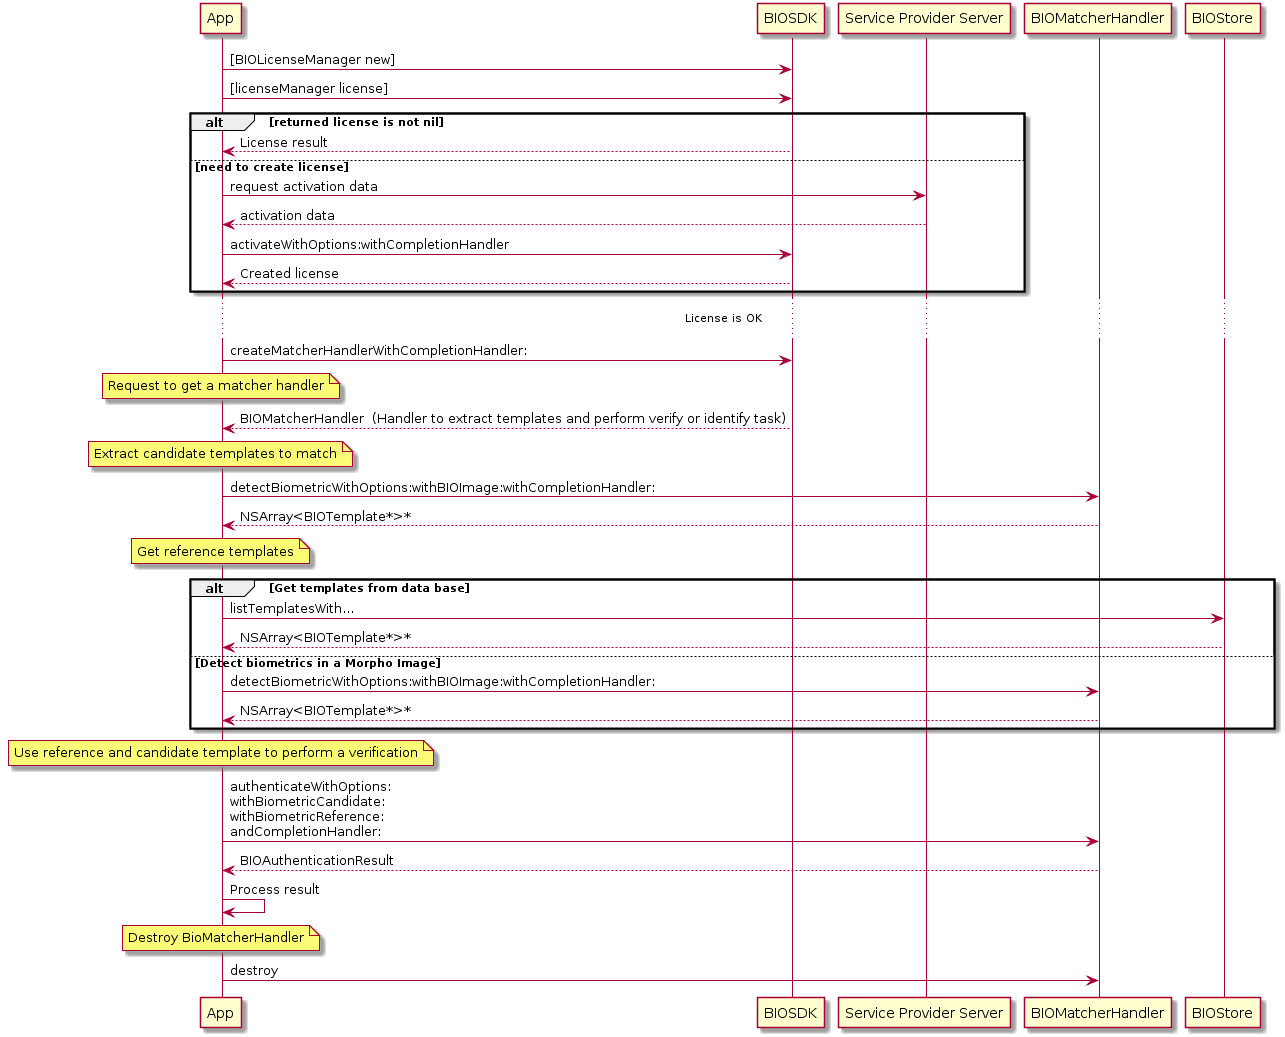
Authenticate
Below is displayed the generic execution flow to be followed to perform a generic authentication process extracting the biometric’s template from an image (This is the candidate template). Once we have the candidate template, we need to retrieve a list of reference templates to match against the candidate and verify that the candidate template belongs to the user. There are two ways to extract a list of template references. One is retrieving them from the database used during the enrollment process. The second one is extracting the templates from another image with detectBiometricWithOptions:withBIOImage:withCompletionHandler:.
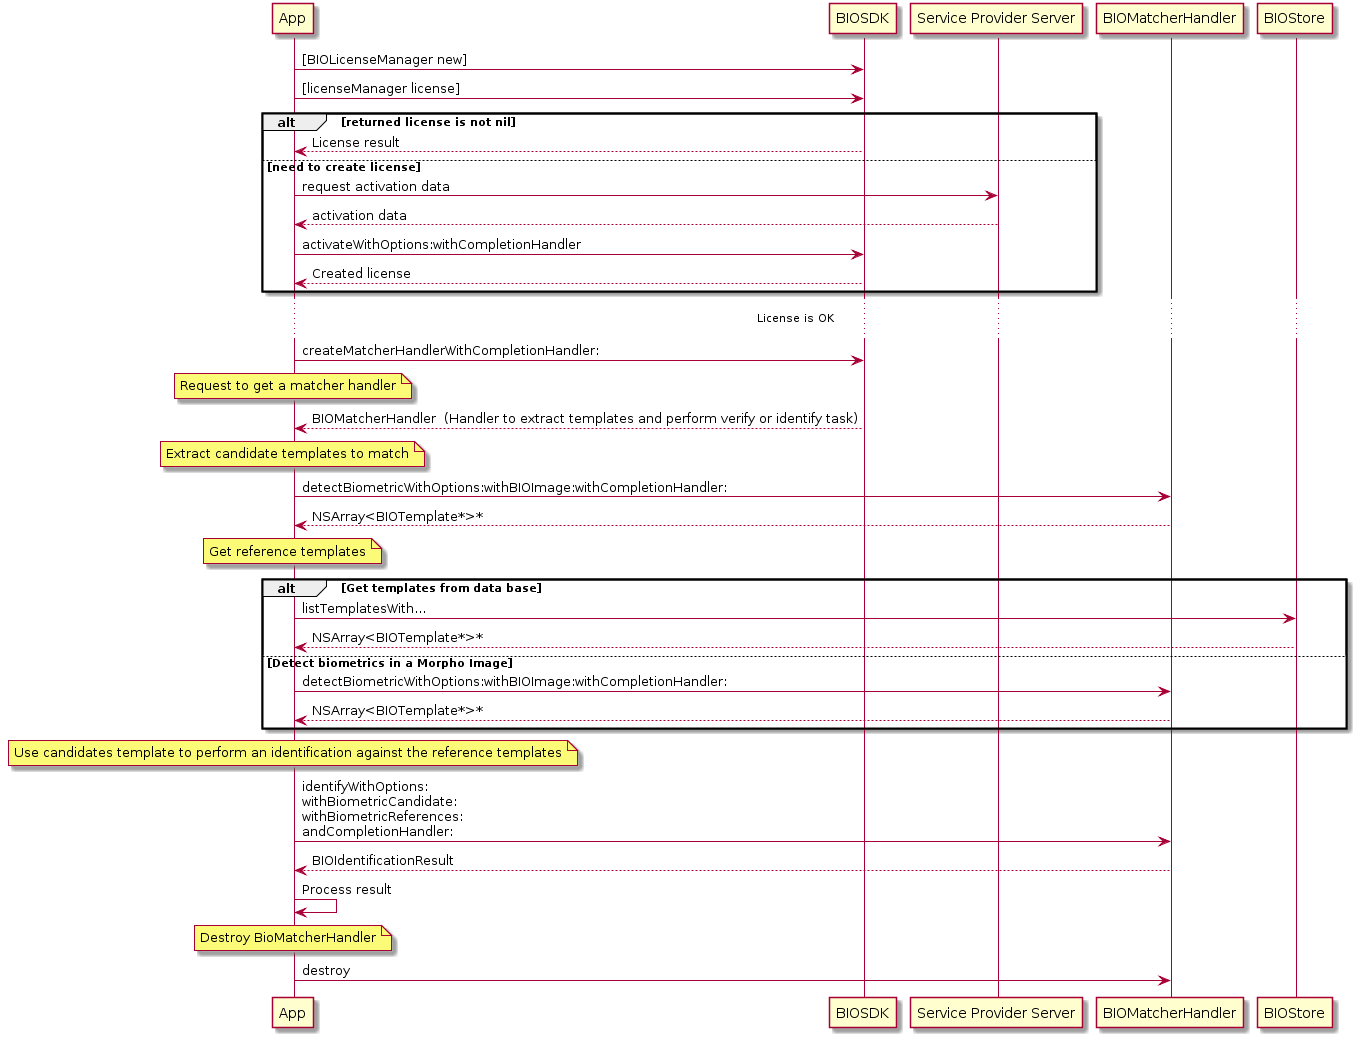
Identify
Below is displayed the generic execution flow to be followed to perform a generic identification process extracting the biometric’s template from an image. Once that we have the candidate template we need to retrieve a list of reference templates to match against the candidate and identify to which user belongs the candidate template.
Detect Biometric
This detects the biometrics in a BIOImage. This function is intended to be used to extract the all the biometric templates contained in an image (For example all the faces that are in an image).

Enabling CaptureSDK logs
To assist with debugging in CaptureSDK, you can enable internal logging to improve issue resolution.
Note: Only the captureHandler API supports displaying logs. In the Use Case API are currently unavailable.
How to enable logging
Set the desired log level using the logLevel property, available in all capture options.
Recommended: Use BIOLogLevelDebug for detailed logs. Other log levels exist but are generally not suitable for integrators.
Swift1let options = DocumentCaptureOptions(mode: .veryLowID)2options.logLevel = BIOLogLevelDebug
Once enabled, additional logs will appear in the Xcode console.
ImageUtils
SDK provides methods to perform various operations on BIOImage such as for example converting BIOImage to various image formats. Those operations are described below.
Compress BIOImage to JPEG
This is the method of the BIOImage class that converts the BIOImage object to NSData object with JPEG file with default compression quality (90% for finger images, 80% for face images, 70% for document images). Created JPEG will contain capture maker note data inside EXIF metadata containing information such as for example SDK version used for capturing the image.
Objective-C1- (NSData *)toJPEG;
Return | Description |
|---|---|
| NSData* | JPEG file binary data. |
Compress BIOImage to JPEG with custom quality
This is the method of the BIOImage class that converts the BIOImage object to NSData object with JPEG file with given compression quality level. Created JPEG will contain capture maker note data inside EXIF metadata containing information such as for example SDK version used for capturing the image.
Objective-C1- (NSData *)toJPEGWithQuality:(CGFloat)quality;
Parameter | Description |
|---|---|
| quality CGFloat | Compression quality in range [0, 1]. |
Return | Description |
|---|---|
| NSData* | JPEG file binary data. |
Get UIImage from BIOImageFromUIImage
This is the method of UIImage (BIOImage) extension that converts a BIOImage to a UIImage.
Objective-C1+ (UIImage*)imageFromBIOImage:(BIOImage*)bioImage
Parameter | Description |
|---|---|
| image BIOImage* | BIOImage to convert to UIImage. |
Return | Description |
|---|---|
| BIOImage* | UIImage from BIOImage. |
Get BIOImage from UIImage
This is the method of the BIOImage (ImageGetters) extension that converts UIImage to BIOImage.
Objective-C1+ (BIOImage*)BIOImageFromUIImage:(UIImage*)image;
Parameter | Description |
|---|---|
| image UIImage* | UIImage to convert to BIOImage. |
Return | Description |
|---|---|
| BIOImage* | BIOImage from UIImage. |
Create a BIOImage with Different Color Space
This is the method of the BIOImage (ImageGetters) extension that converts a BIOImage to another BIOImage with a different color space.
Objective-C1- (BIOImage*)BIOImageWithColorSpace:(BIOColorSpace)colorSpace;
Parameter | Description |
|---|---|
| colorSpace BIOColorSpace | Color space wanted for the new BIOImage. |
Return | Description |
|---|---|
| BIOImage* | BIOImage with the color space provided. |
Compress Image with Quality to NSData
This is a method of BIOImage (BIOResize) extension that compresses an image to a NSData* with determined quality.
Objective-C1- (NSData*)dataByCompressingImageWithQuality:(uint32_t)quality
Parameter | Description |
|---|---|
| quality uint32_t | Quality of the compression (value between 1 and 100). |
Return | Description |
|---|---|
| NSData* | Final data with compression applied. |
Compress Image with Quality to BIOImage
This is the method of the BIOImage (BIOResize) extension to compresses an image to a BIOImage* with determined quality.
Objective-C1- (BIOImage*)imageByCompressingImageWithQuality:(uint32_t)quality
Parameter | Description |
|---|---|
| quality uint32_t | Quality of the compression (value between 1 and 100.) |
Return | Description |
|---|---|
| BIOImage* | Final BIOImage with compression applied. |
Compress Image from Size in Kilobytes to NSData
This is the a method of the BIOImage (BIOResize) extension to compress an image to a NSData* with a determined final size in kilobytes.
Objective-C1- (NSData*)dataByCompressingImageToSizeInKilobytes:(CGFloat)sizeInKilobytes
Parameter | Description |
|---|---|
| sizeInKilobytes CGFloat | Final size in kilobytes. |
Return | Description |
|---|---|
| NSData* | Final data with compression applied. |
Compress Image from Size in Kilobytes to BIOImage
This is a the method of the BIOImage (BIOResize) extension to compress an image to a BIOImage* with a determined final size in kilobytes.
Objective-C1- (BIOImage*)imageByCompressingImageToSizeInKilobytes:(CGFloat)sizeInKilobytes
Parameter | Description |
|---|---|
| sizeInKilobytes CGFloat | Final size in kilobytes. |
Return | Description |
|---|---|
| BIOImage* | Final BIOImage with compression applied. |
Compress Image from WSQ Ratio to NSData
This is the method of the BIOImage(BIOResize) extension to compress an image from WSQ to a NSData* with a determined WSQ ratio. Only fingerprint images should be used in this method.
Objective-C1- (NSData*)dataByCompressingImageToWSQRatio:(CGFloat)ratio withScannerBlack:(Byte)scannerBlack andScannerWhite:(Byte)scannerWhite;
Parameter | Description |
|---|---|
| ratio CGFloat | WSQ ratio for the compression (value between 1.6 and 8000, recommended value between 12 and 15). |
| scannerBlack Byte | Black calibration value (if unknown use 0). |
|scannerWhite Byte | White calibration value (if unknown use 255).
Return | Description |
|---|---|
| NSData* | Final data with compression applied. |
Compress Image from WSQ Ratio to BIOImage
This is the method of the BIOImage (BIOResize) extension that compresses an image to a BIOImage* with a determined WSQ ratio. Only fingerprint images should be used in this method.
Objective-C1- (BIOImage*)imageByCompressingImageToWSQRatio:(CGFloat)ratio withScannerBlack:(Byte)scannerBlack andScannerWhite:(Byte)scannerWhite;
Parameter | Description |
|---|---|
| ratio CGFloat | WSQ ratio for the compression (value between 1.6 and 8000, recommended value between 12 and 15). |
|scannerBlack Byte | Black calibration value (if unknown use 0).
|scannerWhite Byte | White calibration value (if unknown use 255).
Return | Description |
|---|---|
| BIOImage* | Final BIOImage with compression applied. |
Compress Image from JPEG2000 to NSData
This is the method of the BIOImage (BIOResize) extension that compresses and image to a NSData* in JPEG2000 format with a determined maximum size in kilobytes. Only fingerprint images should be used in this method.
Objective-C1- (NSData*)dataByCompressingImageToJPEG2000InKilobytes:(CGFloat)maximumSizeInKilobytes
Parameter | Description |
|---|---|
| maximumSizeInKilobytes CGFloat | Maximum size in kilobytes. |
Return | Description |
|---|---|
| NSData* | Final data with compression applied. |
Compress Image from JPEG2000 to BIOImage
This is the method of the BIOImage (BIOResize) extension that compresses an image to a JPEG2000 in a BIOImage* format with a determined maximum size in kilobytes. Only fingerprint images should be used in this method.
Objective-C1- (BIOImage*)imageByCompressingImageToJPEG2000InKilobytes:(CGFloat)maximumSizeInKilobytes
Parameter | Description |
|---|---|
| maximumSizeInKilobytes CGFloat | Maximum size in kilobytes. |
Return | Description |
|---|---|
| BIOImage* | Final BIOImage with compression applied. |
Crop Image Region (document)
This is the method of the BIOImage (RegionCropping) extension to crop a BIOImage to a determined region.
Objective-C1+ (BIOImage*)cropImage:(BIOImage*)bioImage toRegion:(BIODocumentTrackingInformation*)documentTrackingInfo;
Parameter | Description |
|---|---|
| bioImage BIOImage* | BIOImage to be cropped. |
| documentTrackingInfo BIODocumentTrackingInformation* | Region coordinates that the BIOImage will be cropped to. |
Return | Description |
|---|---|
| BIOImage* | Final BIOImage with the result of the crop, or nil if an error occurred. |
Crop Image Rect
This is the method of the BIOImage (Cropping) extension to crop a BIOImage to a determined rectangle.
Objective-C1- (instancetype _Nullable)cropToRect:(CGRect)rect withMargin:(CGFloat)margin;2- (instancetype _Nullable)cropToRect:(CGRect)rect; // margin = 0
Parameter | Description |
|---|---|
| rect CGRect | Region coordinates that the BIOImage will be cropped to. |
| margin CGFloat | Optional cropping margin |
Return | Description |
|---|---|
| BIOImage* | Final BIOImage with the result of the crop, or nil if an error occurred. |
Crop Image Points
This is the method of the BIOImage (Cropping) extension to crop a BIOImage to a determined rectangle determined by points.
Objective-C1- (instancetype _Nullable)cropToRegionWithPoint1:(CGPoint)point1 point2:(CGPoint)point2 point3: (CGPoint)point3 point4:(CGPoint)point4 withMargin:(CGFloat)margin;2- (instancetype _Nullable)cropToRegionWithPoint1:(CGPoint)point1 point2:(CGPoint)point2 point3: (CGPoint)point3 point4:(CGPoint)point4; // margin = 0
Parameter | Description |
|---|---|
| point1 CGPoint | First point of the region coordinates that the BIOImage will be cropped to. |
| point2 CGPoint | Second point of the region coordinates that the BIOImage will be cropped to. |
| point3 CGPoint | Third point of the region coordinates that the BIOImage will be cropped to. |
| point4 CGPoint | Fourth point of the region coordinates that the BIOImage will be cropped to. |
| margin CGFloat | Optional cropping margin |
Return | Description |
|---|---|
| BIOImage* | Final BIOImage with the result of the crop, or nil if an error occurred. |